- Zoom Integration
- BuddyBoss Integration
- Connect with Facebook Groups
- MailPoet Integration
- ActiveCampaign Integration
- Gravity Forms Integration
- Tutor LMS Integration
- ClickUp Integration
- Stripe Integration
- Trello Integration
- Formster Webhook Setup
- Connect WhatsApp Cloud API
- Flowlu Webhook Setup
- Gozen Forms Webhook Setup
- Formsite Webhook Setup
- GetLeadForms Webhook Setup
- Acadle Webhook Setup
- BombBomb Webhook Setup
- Book Like A Boss Webhook Setup
- Chargebee Webhook Setup
- Zoho Forms Webhook Setup
- MightyForms Webhook Setup
- NativeForms Webhook Setup
- FormKeep Webhook Setup
- Paperform Webhook Setup
- ConvertKit Integration
- Asana Integration
- CloudWaitress Webhook Setup
- Clustdoc Webhook Setup
- Content Snare Webhook Setup
- Cognito Forms Webhook Setup
- Coupontools Webhook Setup
- Crove Webhook Setup
- Beagle Security Webhook Setup
- Billsby Webhook Setup
- BlockSurvey Webhook Setup
- Aftership Webhook Setup
- Canny Webhook Setup
- Salesmate Webhook Setup
- Wix Forms Webhook Setup
- BulkSMS.com Webhook Setup
- Clockify Webhook Setup
- Shopify Webhook Setup
- Albacross Webhook Setup
- Apify Webhook Setup
- Awork Webhook Setup
- Todoist Integration Guide
- JetFormBuilder Integration Guide
- How To Set Up Webhook in Chatra?
- How To Set Up Webhook in Chatwork?
- How To Set Up Webhook in Formium?
- How To Set Up Webhook in Bit Form?
- How To Set Up Webhook in GetResponse?
- How To Set Up Webhook in RazorPay?
- OttoKit: VBOUT Integration Guide
- How To Set Up Webhook in Jotform?
- Zoom Webhook
- How To Set Up Webhook in Boost.link?
- How to Set Up Webhook in Carrd?
- How to Set Up Webhook in monday.com?
- How to Set Up Webhook in Brizy Cloud?
- How to Set Up Webhook in GIST?
- How to Set Up Webhook in Dashly?
- How to Set Up Webhook in Customer.io?
- How to Set Up Webhook in Delighted?
- How to Set Up Webhook in DigiSigner?
- How to Set Up Webhook in Digistore24?
- How to Set Up Webhook in Customerly?
- Getting Started with Twitter Integration
- How to Set Up Webhook in Docparser?
- How to Set up Webhook in DocSpring?
- How to Set up Webhooks in DoneDone?
- How to Set Up a Webhook in Easypromos?
- How to Set Up Webhook in Envoice?
- How to Set Up Webhooks in Freshdesk?
- How to Set Up Webhook in FastSpring?
- OttoKit: HubSpot Integration Guide
- How to Set Up Webhook in forms.app?
- How to Set Up Webhook in Frill.co?
- How to Set Up Webhook in Global Patron?
- How to Set Up Webhook in Brilliant Directories?
- How to Set Up Webhook in Drip?
- How to Set Up Webhook in Helpwise?
- How to Set Up Webhook in HelpCrunch?
- How to Set up Webhook in HelpSpace?
- How to Set Up Webhook in HeySummit?
- OttoKit: Encharge Integration Guide
- How to Set up Webhook in Hiveage?
- How to Set Up Webhook in Hopin?
- How to Set Up Webhook in Hippo Video?
- How to Set Up Webhook in Hotmart?
- Using Google Calendar Triggers in OttoKit
- How to Set Up Webhook in Wise?
- How to Set Up Webhook in Kajabi?
- How to Set Up Webhook in Patreon?
- How to Set Up Webhook in Square?
- How to Set Up Webhook in Tawk.to?
- Integration Guide for Slack
- How to Set Up Webhook in Snackeet?
- How to Set up Webhook in Popupsmart?
- How to Set up Webhook in InstantPage?
- How to Set up Webhook in Insightly CRM?
- How to Set Up Webhook in Breakcold?
- How to Set Up Webhook in SendGrid?
- How to Set Up Webhook in Teamwork CRM?
- How to Set Up Webhook in NaturalForms?
- How to Set up Webhook in Invoice Ninja?
- How to Set up Webhook in Invoiless?
- How to Set up Webhook in JivoChat?
- How to Set up Webhook in JVZoo?
- How to Set up Webhooks in Klenty?
- How to Set up Webhooks in Beehiiv?
- How to Set up Webhooks in Woobox?
- How to Set up Webhooks in Drift?
- How to Set Up Webhooks in LearnWorlds?
- How to Set up WebHooks in LiveWebinar?
- How to Set Up Webhooks in ThriveDesk?
- How to Set up Webhooks in Hyros?
- How to create an integration in Segmetrics and obtain the Integration ID?
- How to Set up Webhooks in SavvyCal?
- How to Set up Webhooks in LatePoint?
- How to Set up Webhooks in Flexie CRM?
- How to Set up Webhooks in Trafft?
- How to Setup Webhook in Kommo?
- How to Setup Webhook in Marquiz?
- How to Setup Webhook in Mailparser?
- How to Setup Webhooks in MakeForms?
- How to Setup Webhooks in Manyreach?
- How to Setup Webhook in Memberstack?
- How to Set up Webhooks in Moxie CRM?
- How to Set up Webhooks in Timely?
- How to Set up Webhooks in Clarityflow?
- How to Set up Webhooks in Brevo?
- Using Google Sheets Trigger
- How to Set up Webhooks in SendPulse?
- How to Set up Webhooks in Whereby?
- How to Set up Webhooks in Cloudprinter.com?
- How to Set up Webhooks in Shippo?
- How to Set up Webhooks in SuiteDash?
- How to Set up Webhooks in Systeme.io?
- How to Set up Webhooks in MimePost?
- How to Set up Webhooks in Lob?
- Tips for formatting Discord messages
- How to Set up Webhooks in Paddle?
- How to Set up Webhooks in Cal.com?
- How to Set up Webhooks in Rewardful?
- How to Set up Webhooks in RetargetKit?
- How to Set up Webhooks in Breakdance?
- How to Set up Webhooks in Retable?
- How to Set up Webhooks in Respond.io?
- How to Set up Webhooks in ProductDyno?
- How to Set up Webhooks in Postmark?
- How to Set up Webhooks in RepairShopr?
- How to Set up Webhooks in Gumroad?
- How to Set up Webhooks in Fillout?
- How to Set up Webhooks in Zonka Feedback?
- How to Set up Webhooks in YouCanBook.Me?
- How to Set up Webhooks in Boomerangme?
- How to Set up Webhooks in Wisepops?
- How to Set up Webhooks in Zenler?
- How to Set up Webhooks in Givebutter?
- How to Set up Webhooks in Quotient?
- How to Set up Webhooks in LeadConnector?
- How to Set up Webhooks in Gelato?
- How to Set up Webhooks in Passcreator?
- How to Set up Webhooks in Read AI?
- How to Set up Webhooks in Aircall?
- How to Set up Webhooks in Eventin?
- How to Set up Webhooks in Sakari SMS?
- How to Set up Webhooks in Linear?
- How to Set up Webhooks in Dailybot?
- How to Set up Webhooks in Feathery?
- How to Set up Webhooks in Ticket Tailor?
- How to Set up Webhooks in Bookfunnel?
- How to Set up Webhooks in Onfleet?
- How to Set up Webhooks in MailerSend?
- How to Set up Webhooks in Landbot?
- How to Set up Webhooks in Parseur?
- How to Set up Webhooks in Plutio?
- How to Set up Webhooks in Appcues
- How to Set up Webhooks in Certopus
- How to Set up Webhooks in AnnounceKit
- How to Set up Webhooks in Worksection
- Plug&Pay Webhook
- How to Set up Webhooks in Memberful
- How to Set up Webhooks in Copilot
- How to Set up Webhooks in AppDirect
- How to Set up Webhooks in SendOwl
- How to Set up Webhooks in Tapfiliate
- How to Set up Webhooks in Outgrow
- How to Set up Webhooks in Baserow
- How to Set up Webhooks in Bookingmood
- How to Set up Webhooks in Contentful
- How to Set up Webhooks in Mautic
- How to Set up Webhooks in Localazy
- How to Set up Webhooks in SpreadSimple
- How to Set up Webhooks in Apptivo CRM
- How to Set up Webhooks in SumoQuote
- How to Set up Webhooks in Brizy Cloud
- How to Set up Webhooks in RADAAR
- How to Set up Webhooks in Payhip
- How to Set up Webhooks in Uploadcare
- How to Set up Webhooks in DocuSeal
- How to Set up Webhooks in Builder.io
- How to Set up Webhooks in Toggl Track
- How to Set up Webhooks in Tuskr
- How to Set up Webhooks in meetergo
- OttoKit & Flowlu Integration Guide
- How to Set up Webhooks in Parsio
- How to Set up Webhooks in lemcal
- How to Set up Webhooks in Harvestr
- How to Set up Webhooks in IdentityCheck
- How to Set up Webhooks in Woorise
- How to Set up Webhooks in Webvizio
- How to Set up Webhooks in Probooking
- How to Set up Webhooks in Viral Loops
- How to Set up Webhooks in Personizely
- How to Set up Webhooks in Userback
- How to Set up Webhooks in Weblium
- How to Set up Webhooks in Flock
- How to Set up Webhooks in Xodo Sign
- How to Set up Webhooks in LoneScale
- How to Set up Webhooks in QuickScraper
- How to Set up Webhooks in Sellfy
- How to Set up Webhooks in VNTANA
- How to Set up Webhooks in MoonClerk
- How to Set up Webhooks in Modal Forms
- How to Set up Webhooks in Updown.io
- How to Set up Webhooks in Webapi.ai
- How to Set up Webhooks in VivifyScrum
- How to Set up Webhooks in FeatureOS
- How to Set up Webhooks in ZipWP
- How to Set up Webhooks in Voiceflow
- How to Set up Webhooks in GitLab
- How to Set up Webhooks in PDFMonkey
- How to Set up Webhooks in Hydrozen.io
- How to Set up Webhooks in Agiled
- How to Set up Webhooks in Creatomate
- How to Set up Webhooks in Planning Center
- How to Set up Webhooks in Frame.io
- How to Set up Webhooks in Uptime
- How to Set up Webhooks in FillFaster
- How to Set up Webhooks in Picnie
- How to Set up Webhooks in Umso
- How to Set up Webhooks in Trustmary
- How to Set up Webhooks in Gallabox
- How to Set up Webhooks in Track-POD
- How to Set up Webhooks in Instapage
- How to Set up Webhooks in TuCalendi
- How to Set up Webhooks in Formspark
- OttoKit & tawk.to Integration Guide
- How to Set up Webhooks in ParseHub
- How to Set up Webhooks in LeadGen App
- How to Set up Webhooks in EasyCSV
- How to Set up Webhooks in SuperSaaS
- How to Set up Webhooks in GrowthBook
- How to Set up Webhooks in GrowSurf
- vPlan Webhook
- KanbanFlow Webhook
- OttoKit & Advanced Ads Integration Guide
- Recurly Webhook
- SparkPost Webhook
- UseINBOX Webhook
- Sellix Webhook
- Groove Webhook
- Tarvent Webhook
- NinjaPipe Webhook
- Zylvie Webhook
- Zendesk Webhook
- How to generate Client ID and Client Secret in Canva
- Ghost Webhook
- Invoice Ninja Webhook
- Runrun.it Webhook
- Workiom Webhook
- FirstPromoter Webhook
- Easybill Webhook
- Attio Webhook
- Memberstack Webhook
- Netjet.io Webhook
- ArcSite Webhook
- BoldDesk Webhook
- Leave Dates Webhook
- UpKeep Webhook
- Timesheet Webhook
- REsimpli Webhook
- Helpjuice Webhook
- IndiaMART Webhook
- TicketSpice Webhook
- PageVitals Webhook
- MotionTools Webhook
- GivingFuel Webhook
- RedPodium Webhook
- RegFox Webhook
- Formbricks Webhook
- Stormboard Webhook
- GoodDay.Work Webhook
- HeyReach Webhook
- Todoist Webhook
- Configuring and Setting Up a Custom Search Engine in Google Cloud
- Integration Guide for Slack V2
- Jira Webhook
- Prerequisites
- Building an Integration
- Setting Up Authentication
- Setting Up Triggers & Actions
- Publishing Integration
- How To Authenticate Your Application Using The API Key Method
- How to Set-Up the Integration Based on Auth Type Bearer Token
- How To Authenticate Your Application Using OAuth 2.0
- How To Authenticate Your Application Using Basic Auth
- How To Authenticate Your Application Using The JWT Bearer Method
How to Set Up Webhook in DigiSigner?
DigiSigner is a cloud-based electronic signature solution focused on ease of use, speed, and affordability.
The service enables businesses and individuals to sign documents, and agreements and close deals from anywhere in the world.
One of the ways to integrate DigiSigner with other apps and services is via Webhooks.
And in this article, we’ll understand how to set up webhooks in DigiSigner to receive notifications on a webhook URL.
Setting Up Webhook in DigiSigner
To configure the webhook URL, simply follow these steps:
- 1. Log in to your DigiSigner account.
- 2. Navigate to SETTINGS.

- 3. Click on API.

- 4. Copy the webhook link and paste it under the Callback URL field.
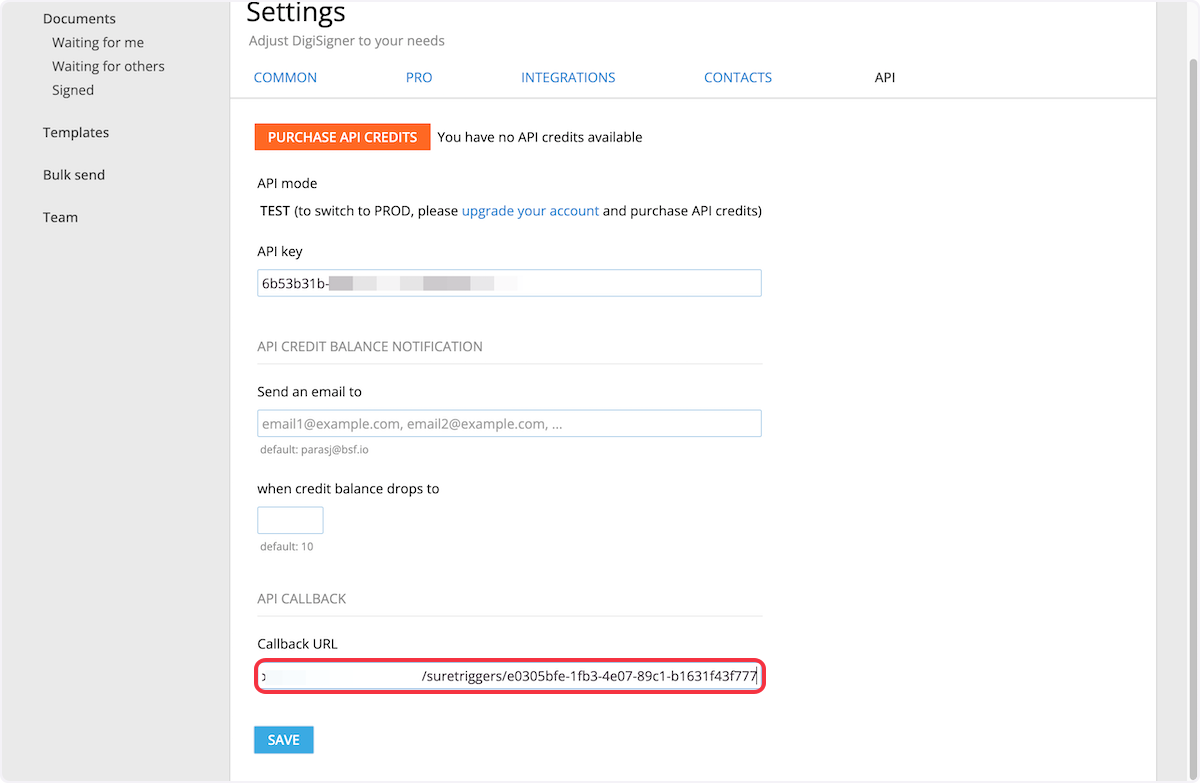
- 5. Click on SAVE.
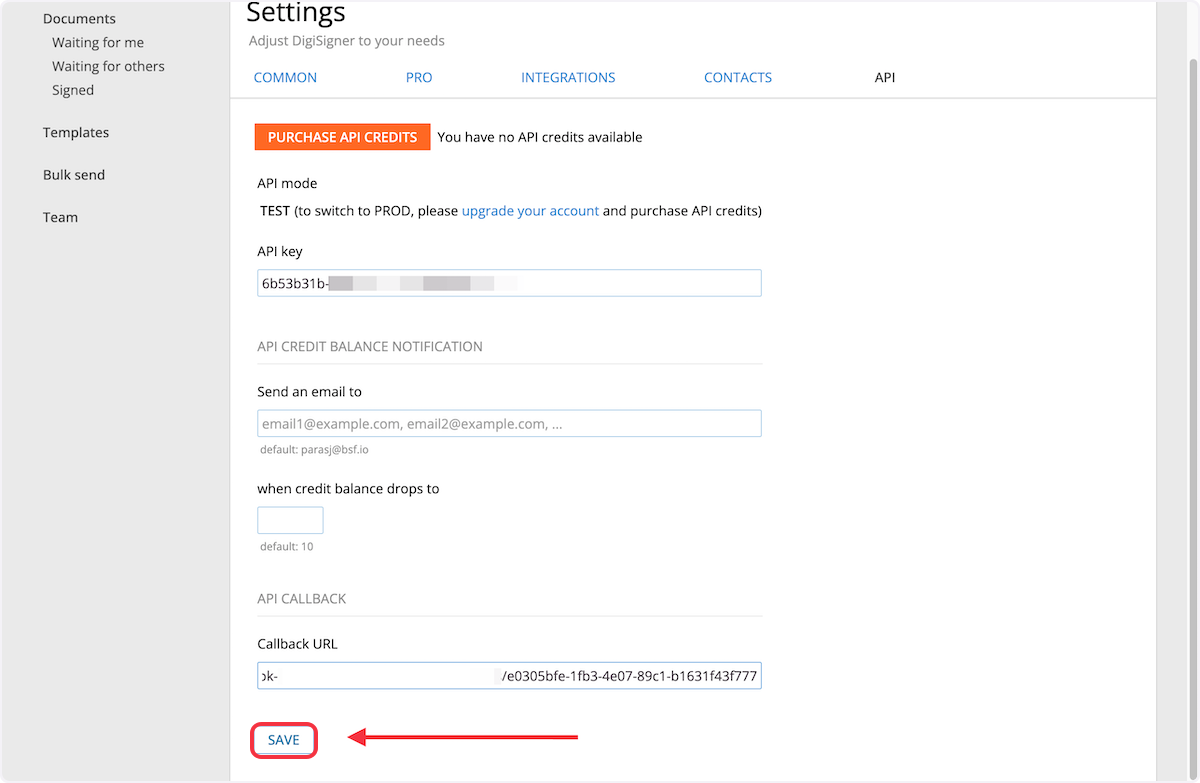
That’s it! You have successfully added a webhook to your DigiSigner account.
Connect DigiSigner with Other Apps
If you want to connect DigiSigner with other apps that you use to automate processes, you must check out OttoKit!
OttoKit provides several DigiSigner integrations to help you automate processes like:
- Sending notifications to your team via email or messaging apps when a document is signed, helping you stay informed in real-time.
- Sending an agreement or contract through DigiSigner for signature, when a user submits a form on your website.
These are just some random examples of automation. OttoKit can do a lot more!
To learn more, join our Facebook community.
We don't respond to the article feedback, we use it to improve our support content.