
Hello there, fellow website enthusiasts and WordPress explorers!
Let’s imagine you own several WordPress websites. You need to run your business across all these sites, moving information from one to another and performing actions on each.
In this step-by-step article, we’ll talk about how you can share logins across WordPress sites.
Let’s dive right in!
- Why Create Users Between Multiple WordPress Sites?
- Different Ways To Share Logins Between Multiple WordPress Sites
- More About SureTriggers!
- How Does Automation Work in SureTriggers?
- How To Get SureTriggers?
- How To Connect Different WordPress Sites With SureTriggers?
- Create A Workflow To Share Logins Across Sites Using SureTriggers
- Do More With SureTriggers
- Copy the Example Workflow and Use It Yourself
- Conclusion
For example, you’re selling subscriptions for online courses on Site A using WooCommerce and enrolling customers into a membership program on Site B. At the same time, you want to keep track of your customers using a tool on Site C.
Now, why would you want multiple websites?
Well, there are some very good reasons:
Design
When it comes to designing your website, it’s essential to consider its purpose. For instance, an online store and a learning site have different needs.
An online store should focus on a visually appealing and user-friendly interface, professional appeal of the banners and pop-ups, while a learning site may require a different design approach to cater to its educational goals.
Finding the right balance in visual elements, such as color schemes and fonts, plays a crucial role in creating an engaging user experience. Utilizing a versatile tool like a logo maker can further enhance your website’s identity and brand presence.
Speed
The speed of your website is crucial. Overloading your site with numerous plugins can slow it down. It’s important to strike a balance between functionality and performance to ensure a seamless user experience.
User Experience
Speaking of user experience, keeping things organized can greatly enhance navigation.
When content is logically categorized and easy to locate, visitors can quickly find what they’re looking for. By prioritizing ease of use in your design, you can create an engaging and efficient online environment tailored to your specific audience.
So, there are some good reasons for having multiple sites. But here’s the challenge: managing all your websites and syncing information between them manually can be time-consuming.
For example, when someone buys something on your WooCommerce store, you might want to automatically sign them up for a course on your learning site.
Doing all this by hand takes a lot of time and isn’t very efficient.
Doing everything manually might look a little something like this:
- You have to watch your store for each sale.
- When a sale happens, you go to your course site and create a user account with the same details as the customer used for making the purchase.
- You add them to the right course.
- Finally, you send the customer their login information through email or a message.
That’s a lot of work, right?
And that’s just for one sale. Imagine doing this for 20 sales a day – it’s a big job!
But what if we tell you if there’s a simple way? A really simple way where you don’t even have to lift a finger to share logins from one site to another?
How about a process where you don’t have to do anything to handle all these tasks?
It’s as simple as someone making a purchase on a WooCommerce site and being automatically added as a student on your LearnDash site.
Cool, right? Well, it’s possible with a very cool visual automation builder called – SureTriggers!
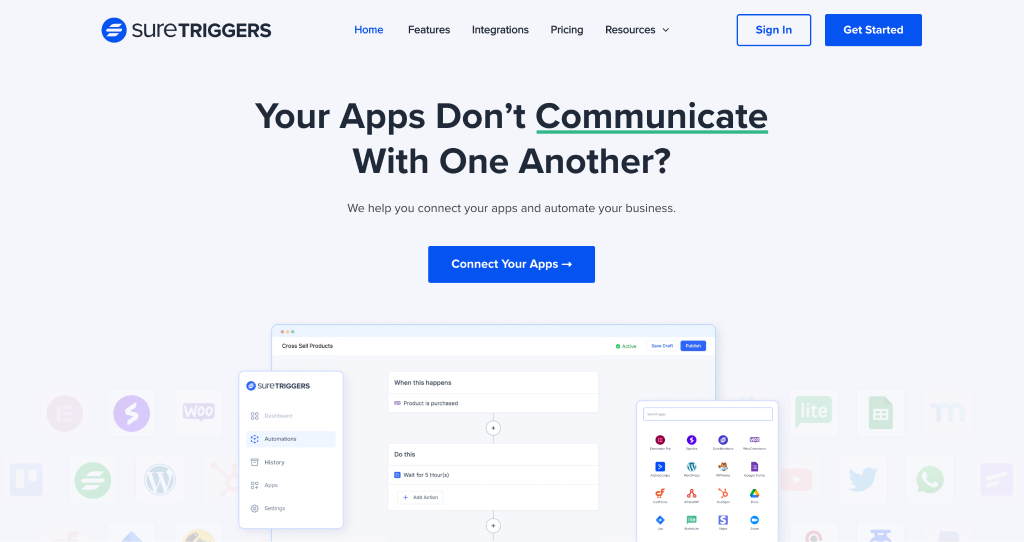
SureTriggers helps you connect multiple WordPress sites with each other and automate repetitive tasks.
Like sending order confirmation messages on WhatsApp after someone makes a purchase from your WooCommerce store, and then automatically adding the customer to your CRM tool.

In this article, we’ll delve deeper into SureTriggers and demonstrate how you can effortlessly share logins from one site to another using the user-friendly Visual Automation Builder.
Why Create Users Between Multiple WordPress Sites?
If you have several business websites, it’s important to make things easy for your customers.
For example, if you’re a business coach who sells courses, you might have different websites for different purposes.
You could have:
- A portfolio website for showcasing your work.
- An online store for selling your courses or services.
- A learning website where people can access the courses they purchase from your store.
- A community website where your audience can connect with each other. It can be created with plugins like BuddyBoss.
Now, when someone buys a course from your online store, you might want them to automatically have access to the course on the course website platform. And then, you’d like them to be part of your community site and use all its features.
So to make this happen smoothly, you’ll need to create user accounts on all these websites. This way, your customers can access everything you have to offer.
Different Ways To Share Logins Between Multiple WordPress Sites
Let’s talk about simple ways to share user login info between different WordPress sites. This way, you can easily create user accounts on multiple sites.
You can do this manually or use a handy tool like SureTriggers to do it automatically.
Doing It Manually
One way is to create and share logins by hand.
Here’s how:
- Retrieve the user’s login credentials from the source WordPress site.
- Navigate to the target WordPress site.
- Create a new user account on the target site by manually entering essential user information, including the username, email, and password.
- Send the login details to the user via email.
This approach is fine if you do not have to create a lot of users. But if you have to create a lot of users on different sites, you will be spending most of your time creating users and typing emails, instead of building strategies to grow your business.
Using Automation Tools Like SureTriggers
If you don’t want to create logins manually, you can make life easier with SureTriggers. It’s a tool that automates all manner of repetitive tasks.
SureTriggers links up with your WordPress sites and can share data between them and perform actions across them.
Here’s a quick overview of how it works:
- You set up some rules for SureTriggers to follow.
- When someone creates an account on one site, SureTriggers automatically creates accounts on other sites you pick.
It makes sure everything is done right every time.
Tools like SureTriggers are great when you’re handling lots of WordPress sites or when you need everything to sync up quickly. They save time and make it less likely for mistakes to happen!
More About SureTriggers!
SureTriggers is a visual automation builder that helps you connect multiple WordPress sites, plugins, and web apps with each other and automate tasks.
It works with over 200 apps and plugins, allowing you to move information between them easily.
It simplifies the process of connecting your WordPress websites and seamlessly transferring data between them, including posts, user information, and more.
It makes it easy to connect your WordPress plugins with each other, even if they’re on different sites.
For example, you can add people to a CRM tool like FluentCRM installed on a different site when they buy something from your WooCommerce store.
Here are some automation examples that you can create with SureTriggers:
- Create a WordPress user on site B, whenever a user is created site A
- Share new blog posts from one WordPress site to multiple other sites or social media platforms.
- Add new subscribers to your email marketing list whenever a user registers on any of your WordPress sites.
- Capture leads from contact forms on different WordPress sites and centralize them in one CRM system or email marketing platform.
That’s not all!
SureTriggers extends its capabilities beyond WordPress. It can also connect with other web apps like HubSpot, ActiveCampaign, Sendinblue, and many others.
This makes it easier to automate tasks across different platforms.
How Does Automation Work in SureTriggers?
Automation in SureTriggers works on the concept of triggers and actions.
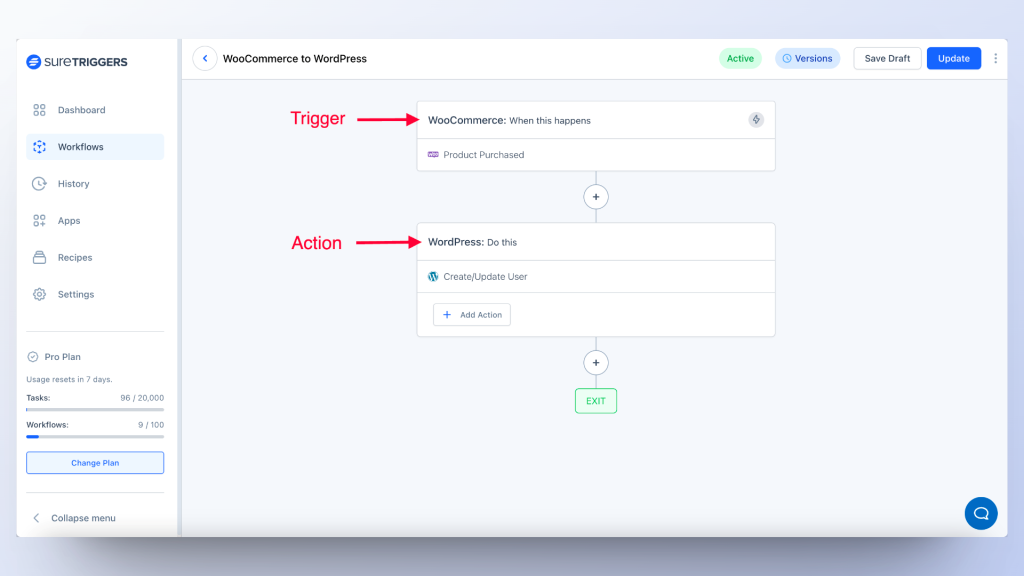
Triggers are the events that start your automation. For example, a contact form being filled, or a new post being published on your site.
Actions are what happens after the trigger event, like a chain reaction. So, in our example, an action could be making a Twitter post mentioning your new article, or sending a message on Slack when you receive a message from your contact form.
One complete set of triggers and actions is called a Workflow. Like creating a Twitter post automatically when you publish a new article on WordPress.
How To Get SureTriggers?
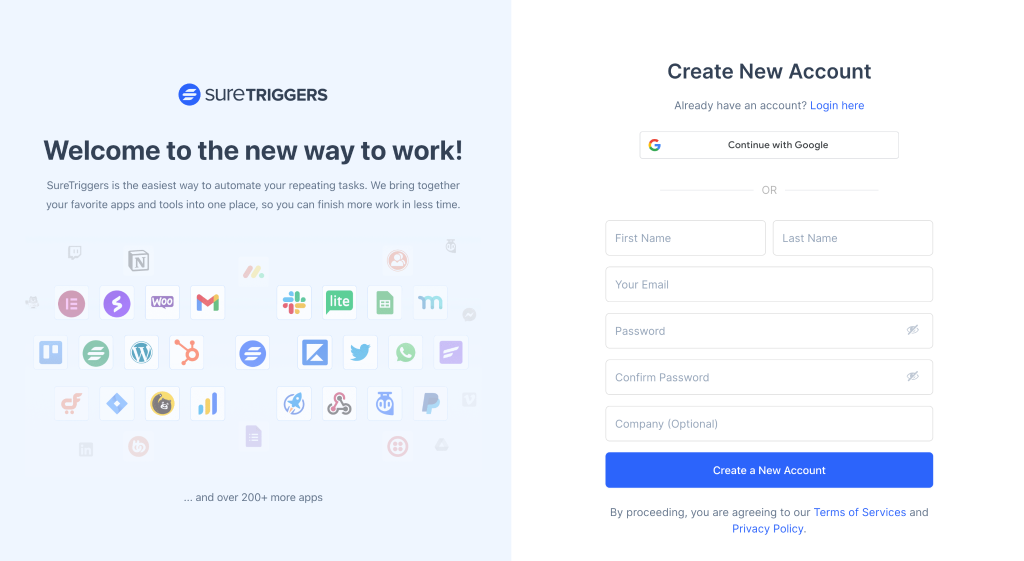
SureTriggers is a web application that you can sign up for free from here.
To connect SureTriggers with your WordPress site, you can download, install, and activate the SureTriggers plugin as you normally would.
How To Connect Different WordPress Sites With SureTriggers?
After setting up your SureTriggers account, you can connect your favorite apps and start creating workflows.
If your primary goal is to automate WordPress-related tasks, it’s a breeze.
Just install the SureTriggers plugin on your WordPress site, and then, follow the on-screen instructions to link it to your SureTriggers account.
And if you need help, here’s a video that shows how you can connect your WordPress site with SureTriggers.
How to Connect Your Apps with SureTriggers!
Create A Workflow To Share Logins Across Sites Using SureTriggers
It is very simple to create workflows in SureTriggers.
Here’s an example where we create a workflow to automatically add a user account on a learning site and enroll them into a LearnDash course.
Prepare in Advance
You should have the following things ready:
- A SureTriggers account.
- SureTriggers plugin installed and connected to your WordPress sites.
Once you have these ready, you can follow the steps below to create your workflow.
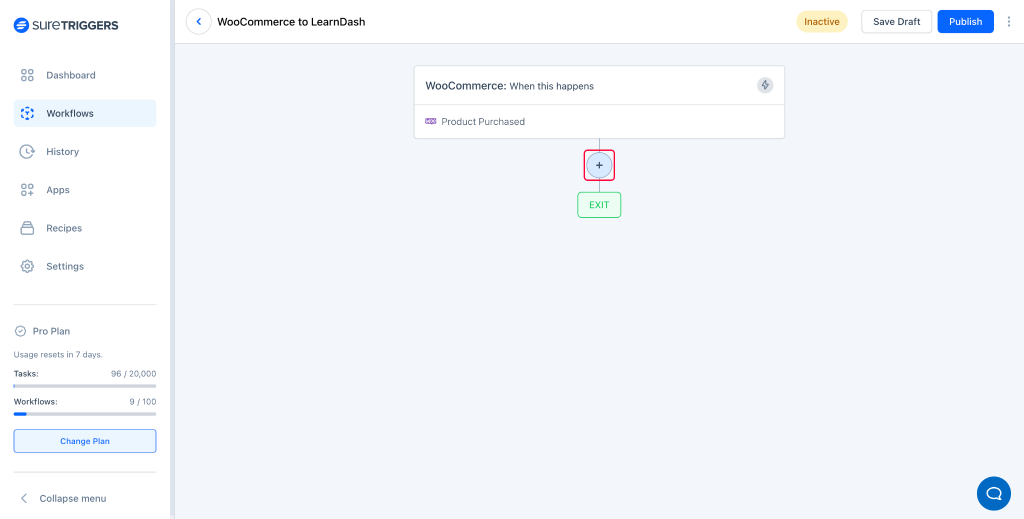
Setting Up Trigger for WooCommerce
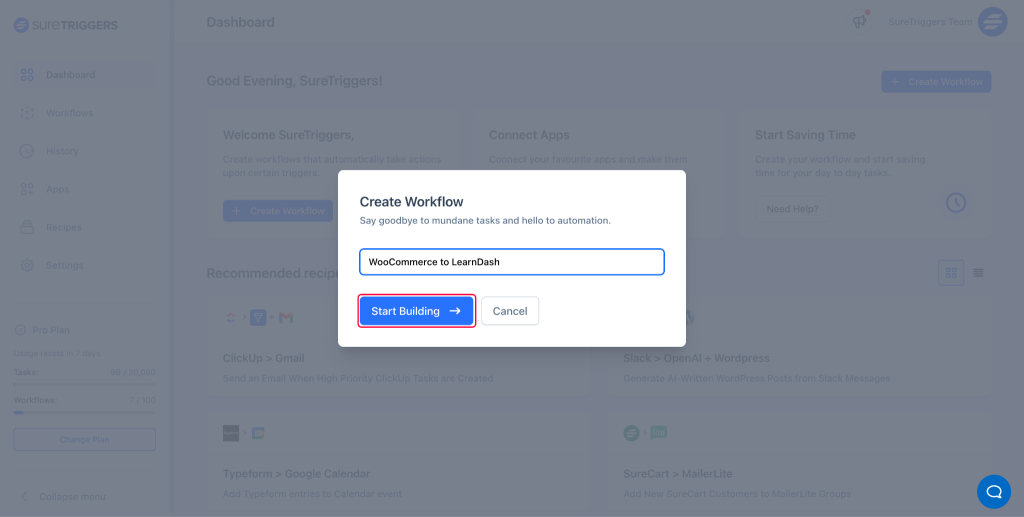
- Log into your SureTriggers account.
- Click the Create Workflow button.
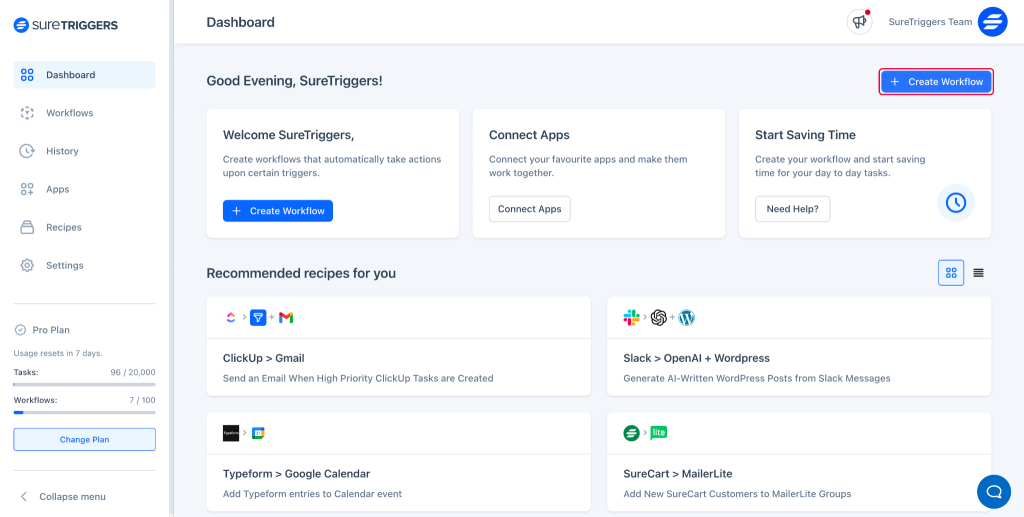
- Name your workflow and click the Start Building button.
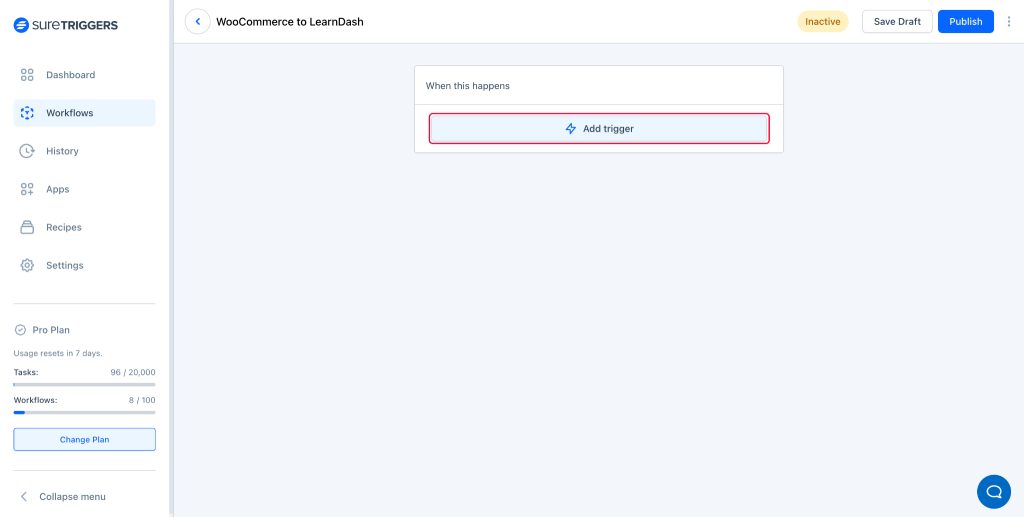
- Click the Add Trigger button.
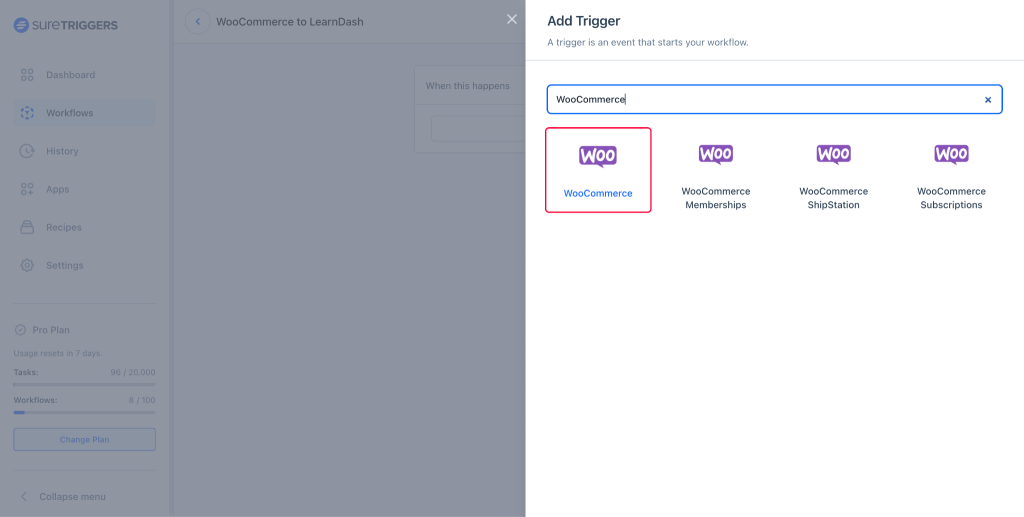
- Select your trigger app as WooCommerce.
- Select the trigger event as Product Purchased.
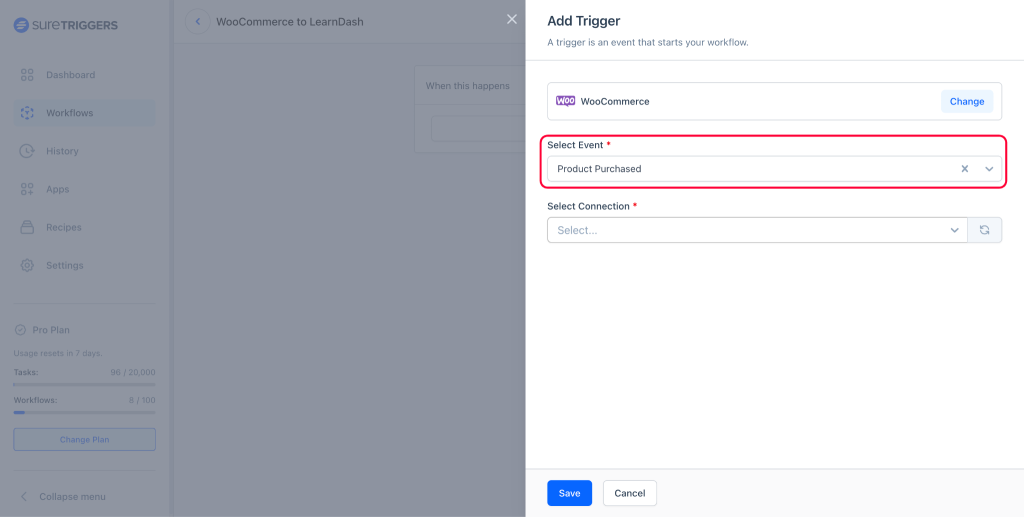
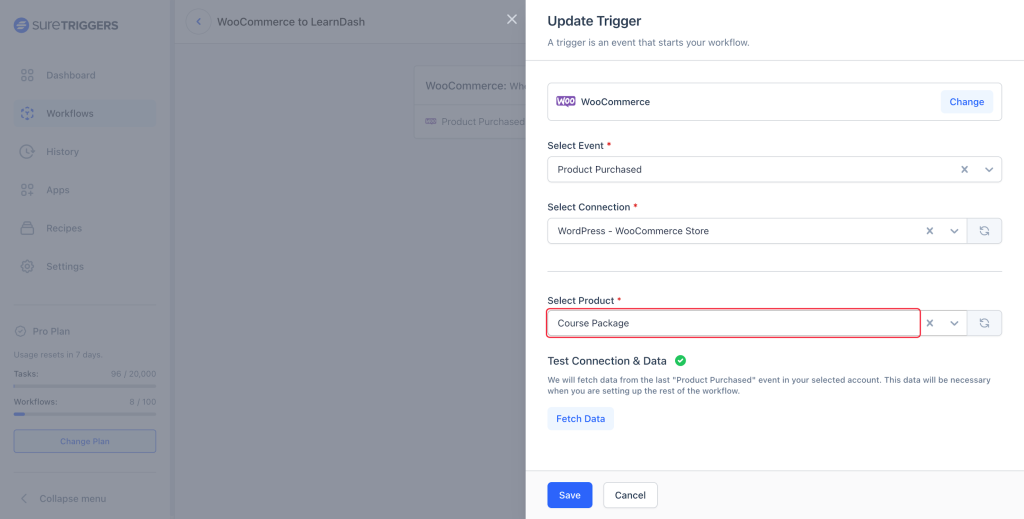
- Select your WooCommerce site for Select Connection.
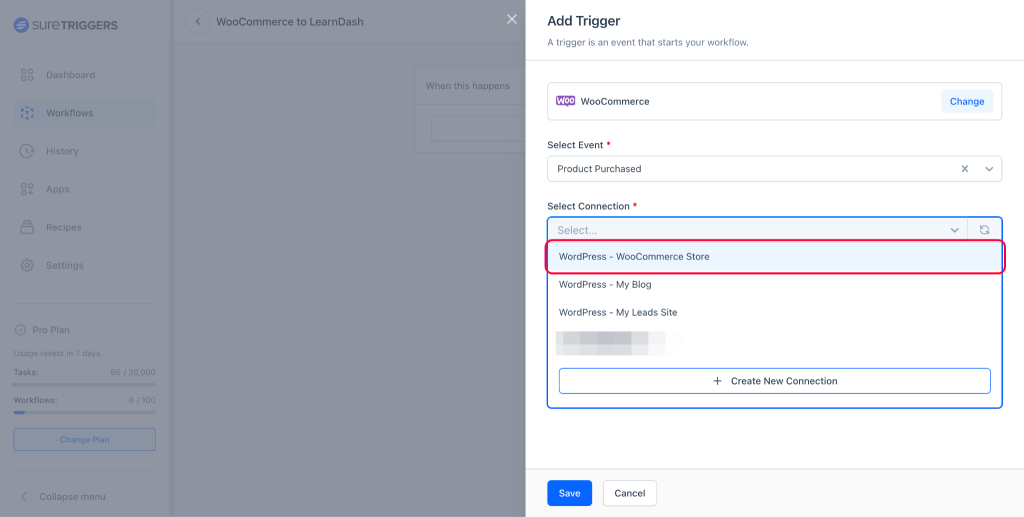
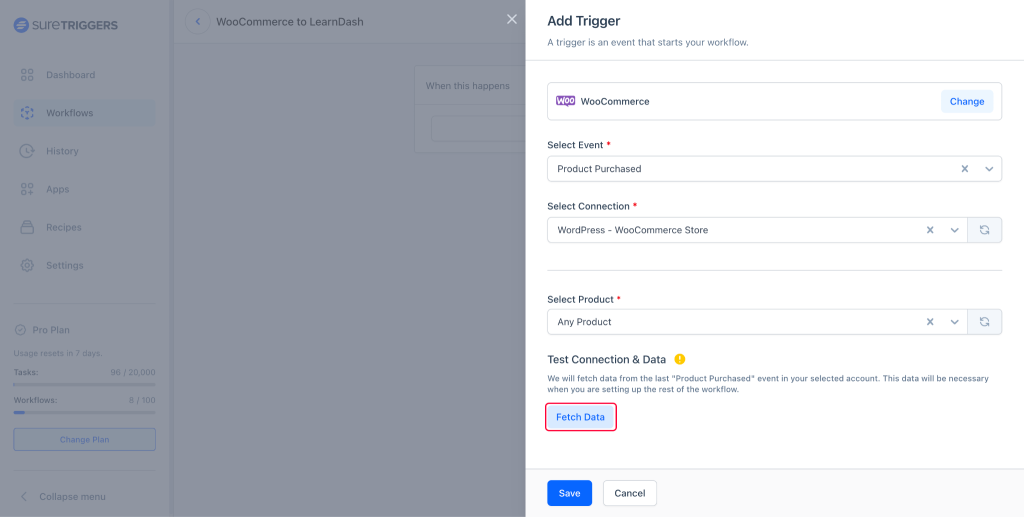
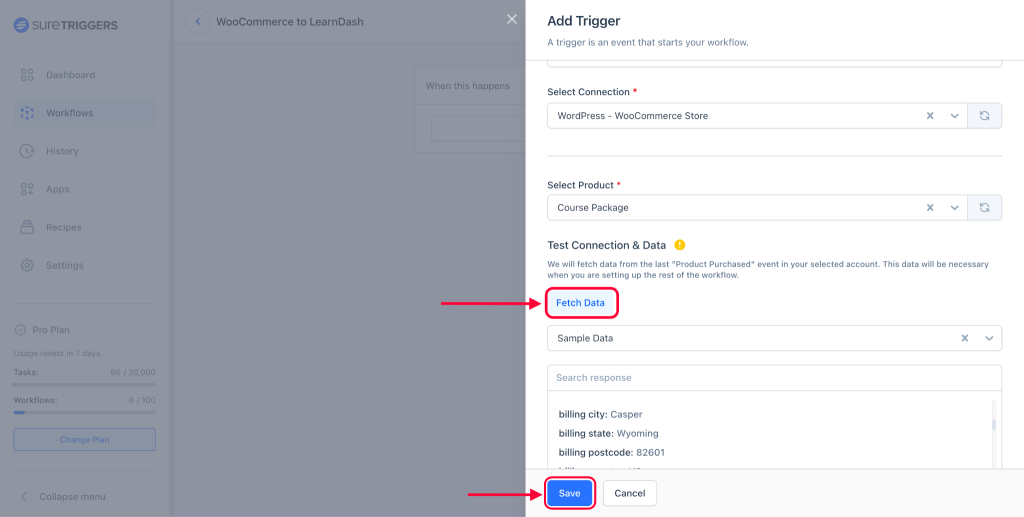
- Select the product that should trigger this workflow.
- Click the Fetch Data button to bring the last order details in your WooCommerce store. It will include the customer’s details that we will use to create a user on the LearnDash site.
- Once the data appears, you can save this step.
Next, we’ll set up an action to create a WordPress user on your LearnDash site.
Setting an Action To Create Users on the LearnDash Site
- Click the Plus icon.
- Search and select WordPress as the action app.
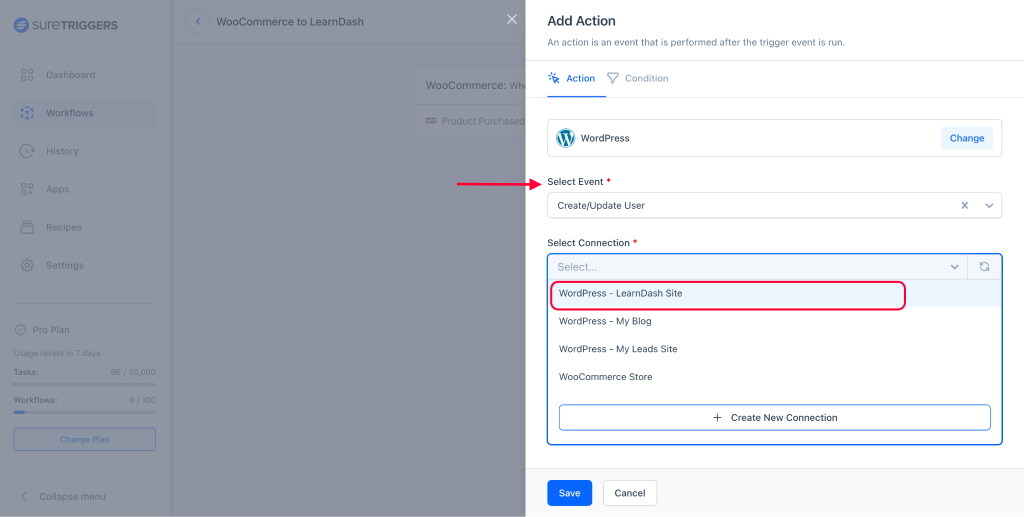
- Select the action event as Create User and add your LearnDash site as the connection.
- Type @ in the username field and map the customer’s name from the last step.
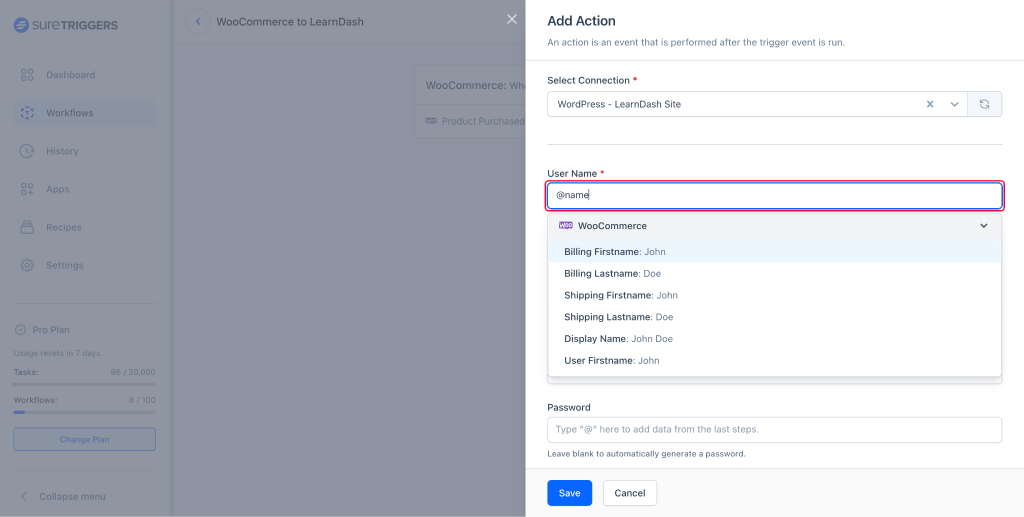
- Add other details from the last steps like first name, last name, etc.
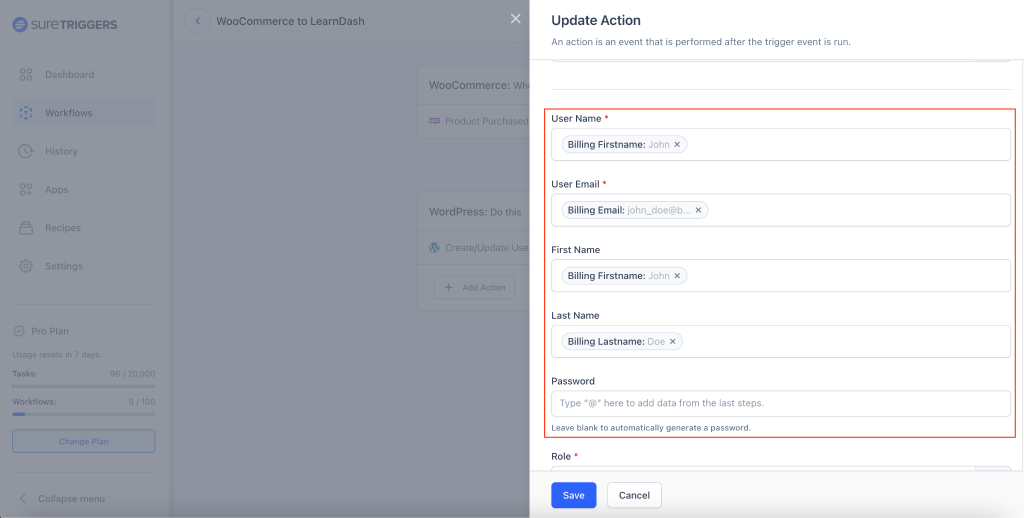
- If you want to automatically generate a password for every user, then leave the password field blank.
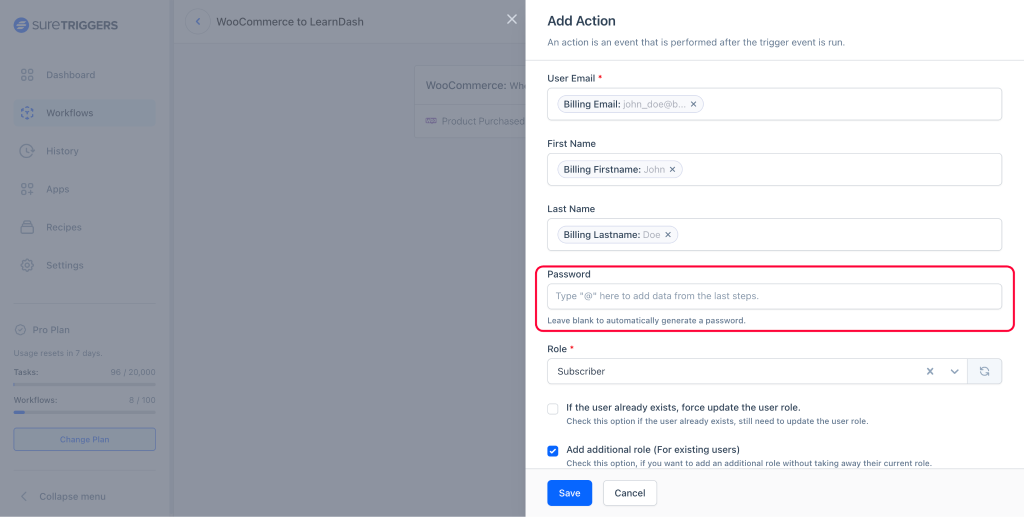
- Select the role that you want to assign to users.
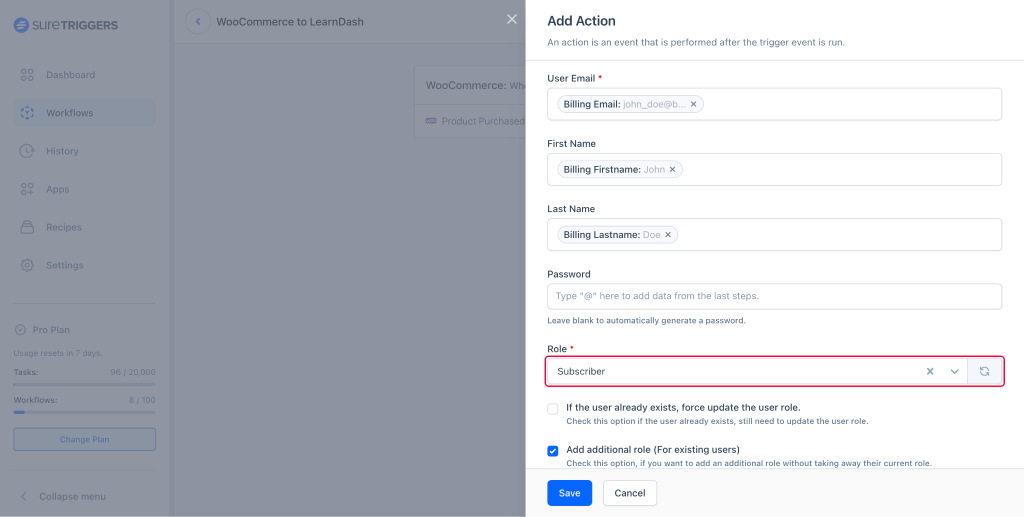
- Set the additional settings for this assigning roles as per your preference and click the Test Action” button.
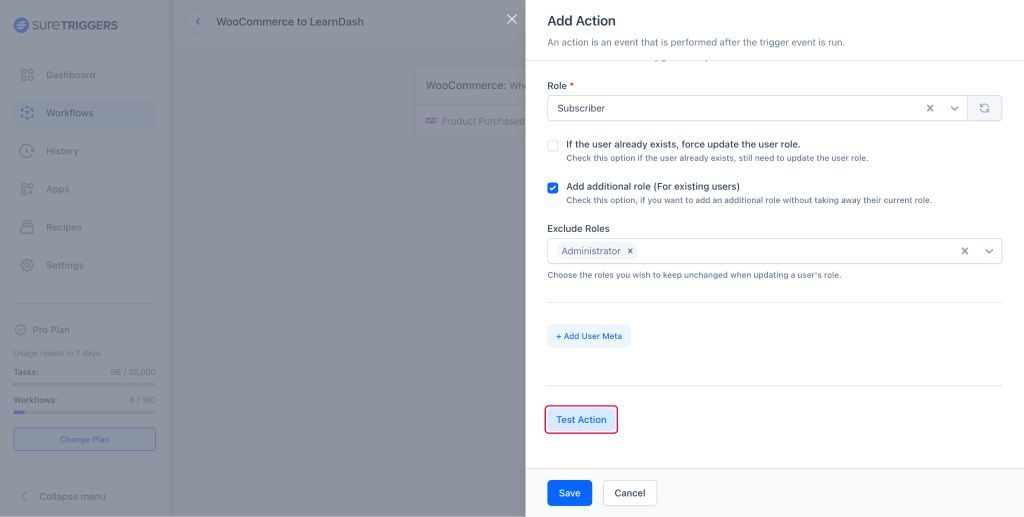
- After you get the results, you can save this step.
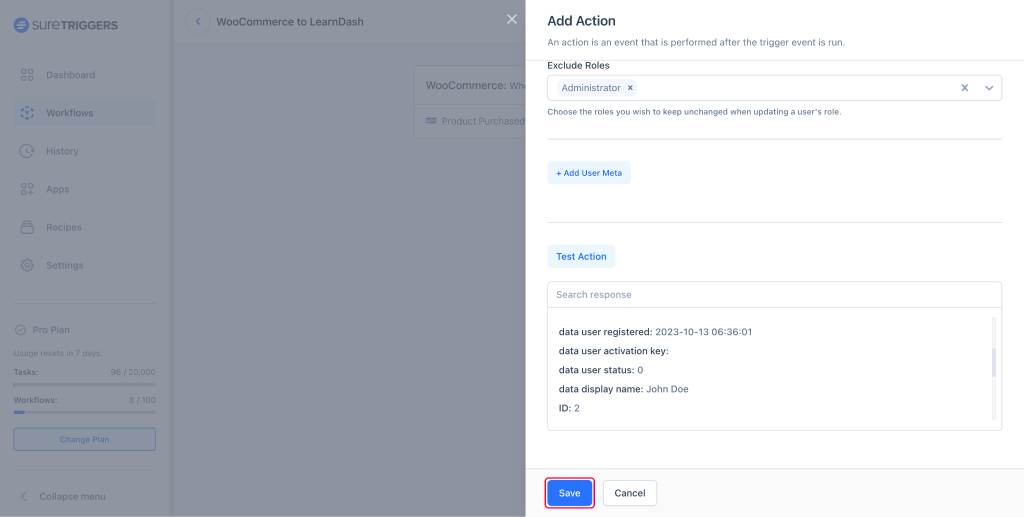
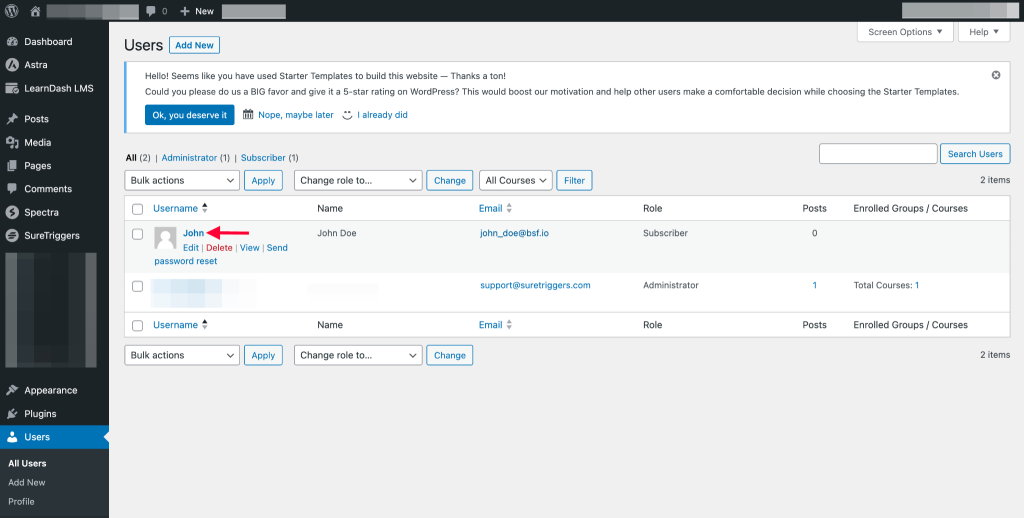
After performing the test action, you will notice a user created in your LearnDash site, with the buyer’s details from your last WooCommerce order.
Next, we’ll set up a step to enroll the user onto our LearnDash course!
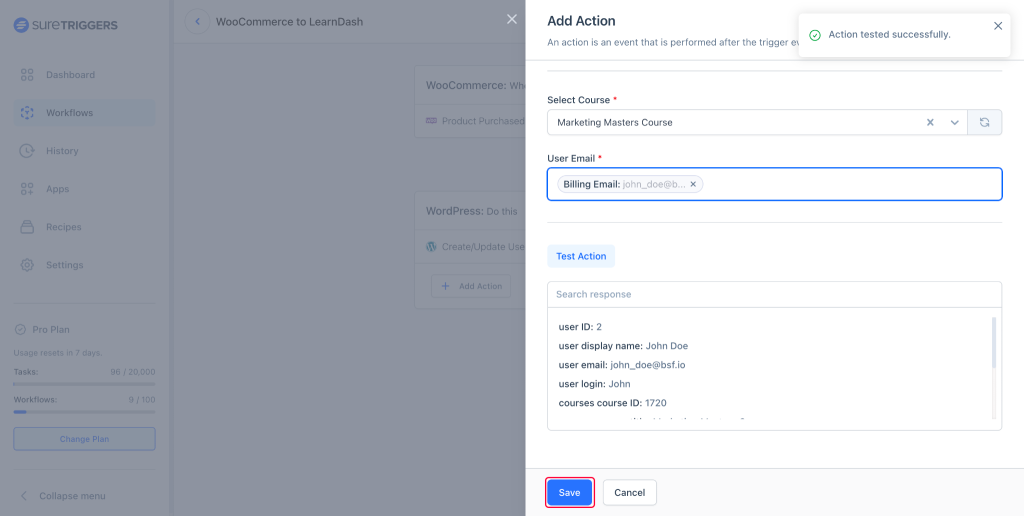
Setting Up an Action To Enroll Users on a LearnDash Course
- Click on the Plus icon.
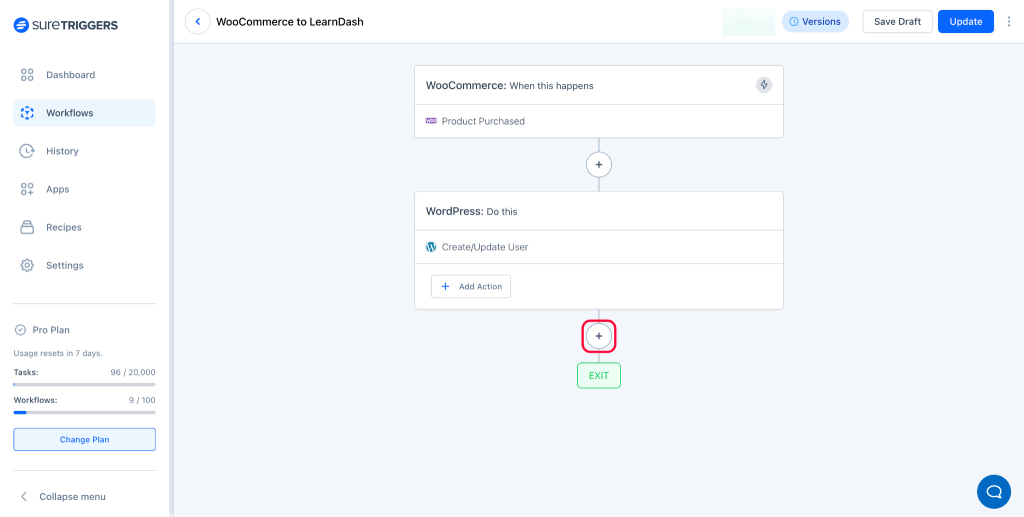
- Search and select LearnDash as the action app.
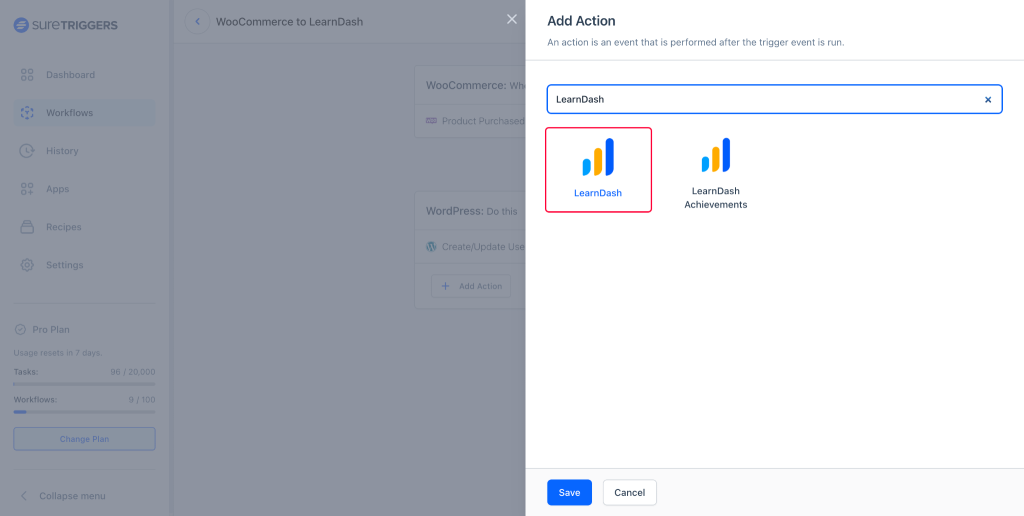
- Select action event as Enroll User into Course and your LearnDash site as the connection
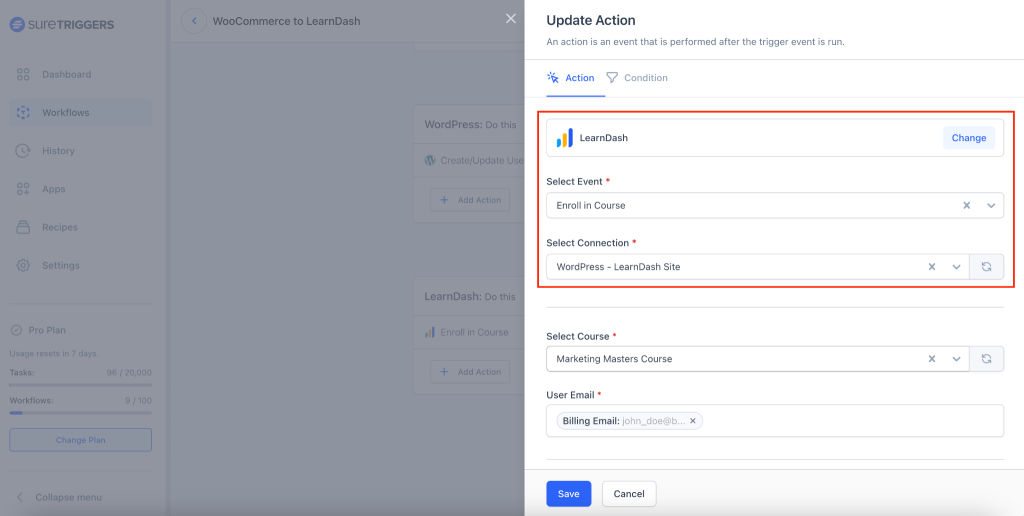
- Select the course in which you want to enroll the user.
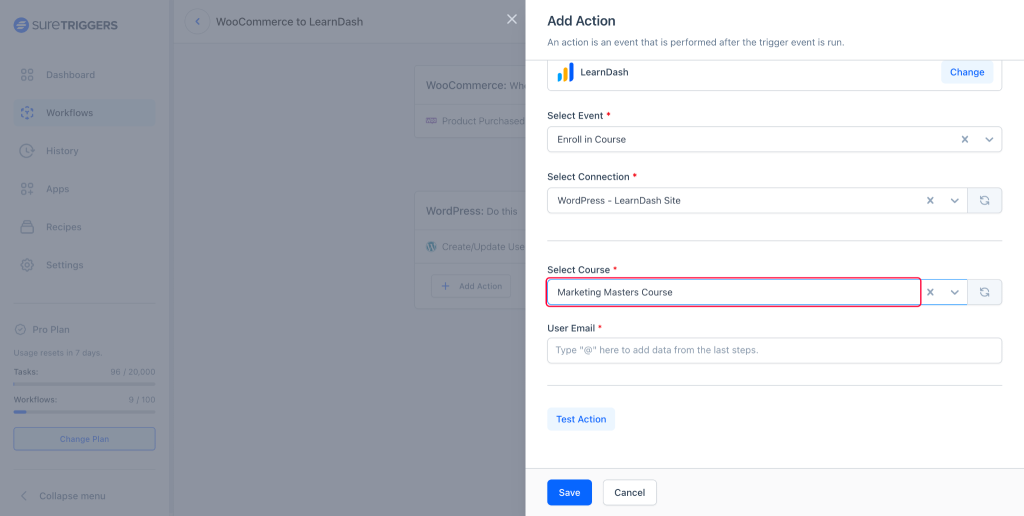
- Type @ and map the customer’s email from the WooCommerce step.
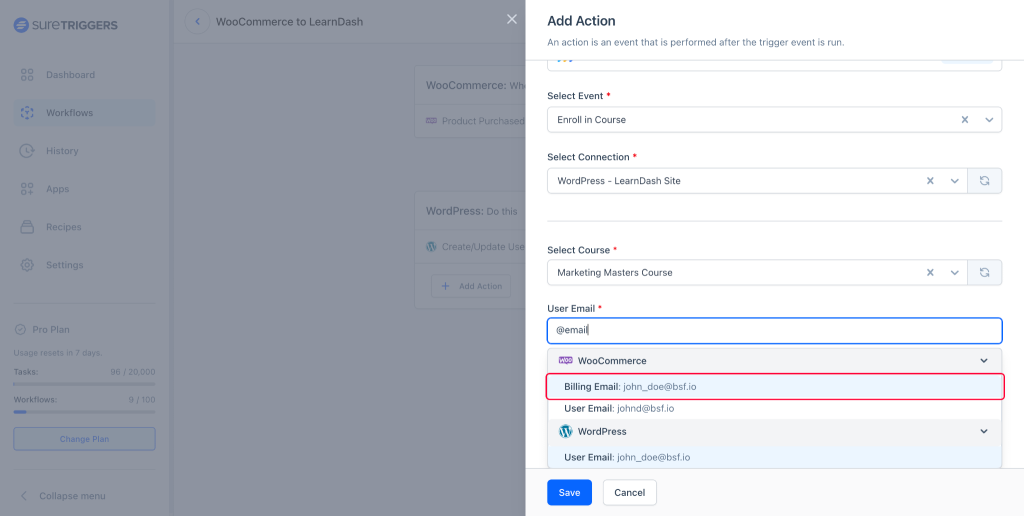
- Click on the Test Action button.
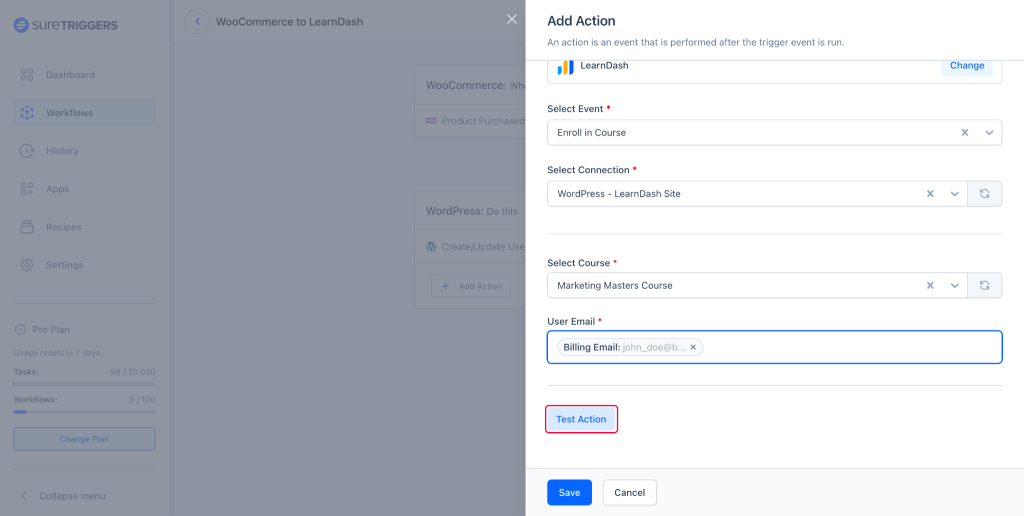
- Once the test action is successful, save this step.
- Click on the Publish button to start the workflow.
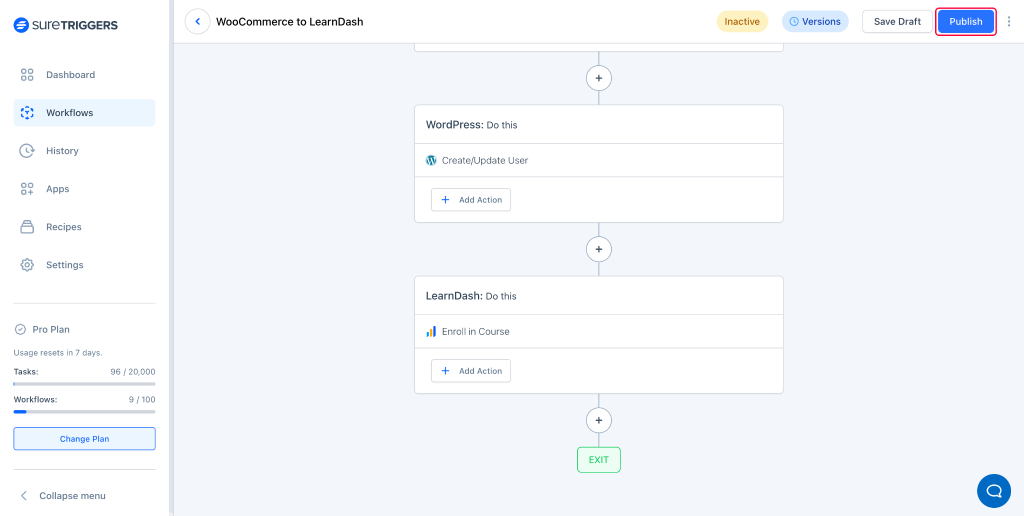
Congratulations, your first workflow is live!
From now on, whenever someone purchases a course from your WooCommerce store, they will automatically be registered as a user on your LearnDash site and enrolled in the course.
WooCommerce and LearnDash are just examples.
You can create a similar workflow even if you’re using a different eCommerce solution such as SureCart, or a learning management platform like LifterLMS. 💪
Do More With SureTriggers
With SureTriggers, you can do a lot more than create users on WordPress sites and enroll them in courses.
The workflow in our example is just a starting point, and you have the freedom to enhance it with more to better meet your specific needs.
For instance, after a user has been successfully enrolled in a course, you can take additional actions like:
- Sending them a personalized email with their login details, course materials, and a warm welcome message to enhance their onboarding experience.
- Add their details to your CRM tools.
- Add them to your emailing list in tools like MailerLite or Mailchimp..
And just like that, your workflow is complete. You don’t have to lift a finger for this entire process from now on!
Copy the Example Workflow and Use It Yourself
We’ve provided a detailed explanation of the process for creating a workflow in SureTriggers. You now know how to automatically enroll people in a LearnDash course after they make a purchase from your WooCommerce store.
It sounds fairly straightforward, doesn’t it? But what if we told you it could be made even easier?
Well, it can be!
We’ve set up this exact workflow for you, so there’s no need to start from scratch.
Click on the link below to get a copy of this workflow. From there, you won’t have to do much.
Just replace the demo site information with your real sites, update the WooCommerce product details, adjust the LearnDash course settings, review the workflow setup, and then publish.
Learn to set up a shared workflow.
If you don’t have a SureTriggers account yet, don’t worry. You can easily get started with SureTriggers for free, install the SureTriggers plugin on your sites, and follow the instructions above to get started.
Conclusion
Managing multiple WordPress sites can be a challenge, especially when it comes to user management. You need to create and manage user accounts on each site, which can be time-consuming to say the least!.
But worry not, the solution is fast, efficient and can help you automate the process of sharing logins and creating users.
So, we hope this was helpful!
If you still have concerns about automating tasks using SureTriggers, please let us know and we will be more than happy to help.
Until next time!
Recommended Articles
What Are Webhooks? A Simple Guide to Using Them Like a Pro
How To Set Up WhatsApp Cloud API