
WhatsApp, known for its vast user base, and easy and instant messaging features, has become the go-to for personal and business chats.
Imagine effortlessly blending WhatsApp into your apps, making it easier to engage users and simplify messages. That’s where SureTriggers comes in.
In this article, we’ll dive into WhatsApp Cloud API and how it pairs seamlessly with the SureTriggers automation platform.
Whether you’re an expert creating WhatsApp-connected apps or a business owner looking to streamline customer support or notifications, this guide is here to help.
Read on to explore where WhatsApp Cloud API and SureTriggers can shine. Discover how they can automate appointment reminders, handle customer queries, or send instant alerts, all while enhancing user experiences.
By the end of this post, you’ll have the knowledge and inspiration to leverage these tools most effectively. Let’s jump in and uncover the exciting possibilities!
What Is an API?
Before we get into the nitty-gritty of WhatsApp Cloud API, let’s break down what an API is.
Think of an API (Application Programming Interface) as a special language that allows different software programs to talk to each other and collaborate.
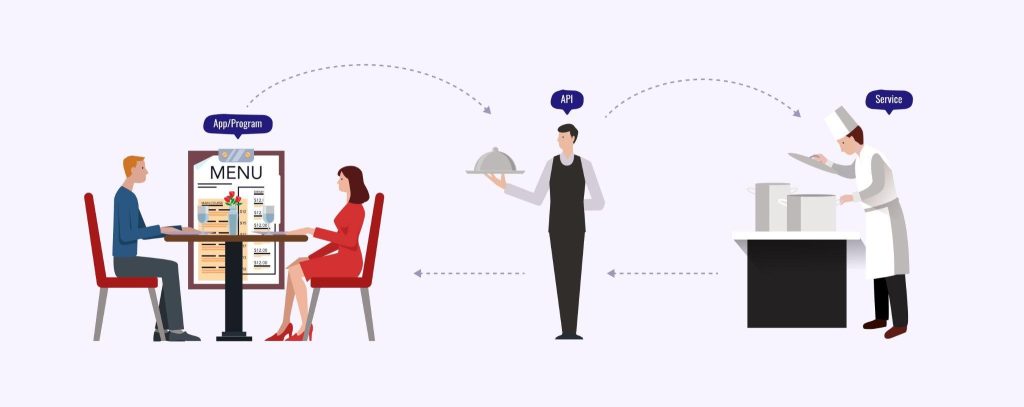
Imagine you’re at a restaurant. You, the customer, have a menu in front of you (that’s your app or program). Instead of going into the kitchen and cooking your meal yourself, you communicate your order to the waiter (that’s the API).
The waiter takes your order to the chef (the service or data you need), and the chef prepares your meal (returns the data). Finally, the waiter brings your meal back to you.
In the digital world, an API works in a similar way.
It enables your application or program to request specific services or data from another application or service, all without needing to understand the intricate details of how that service works.
It’s like the glue that holds everything together, making it possible for different tools to work harmoniously.
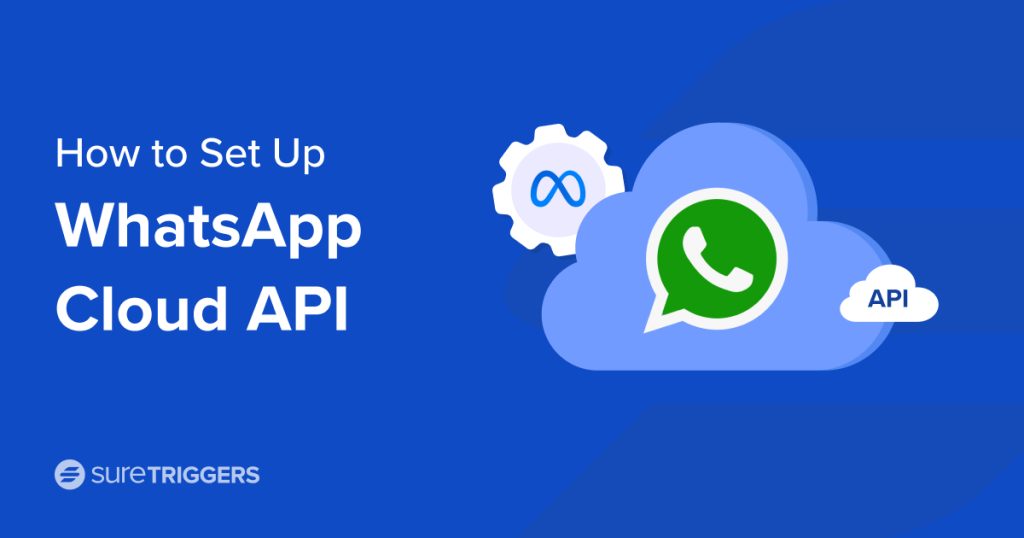
What Is the WhatsApp Cloud API?
The WhatsApp Cloud API is like the bridge that connects WhatsApp to other apps or services.
It’s a way to make WhatsApp’s powerful messaging abilities a part of what you do, whether it’s chatting with customers, sending automated messages, or sending important updates.
Let’s understand this with an example.
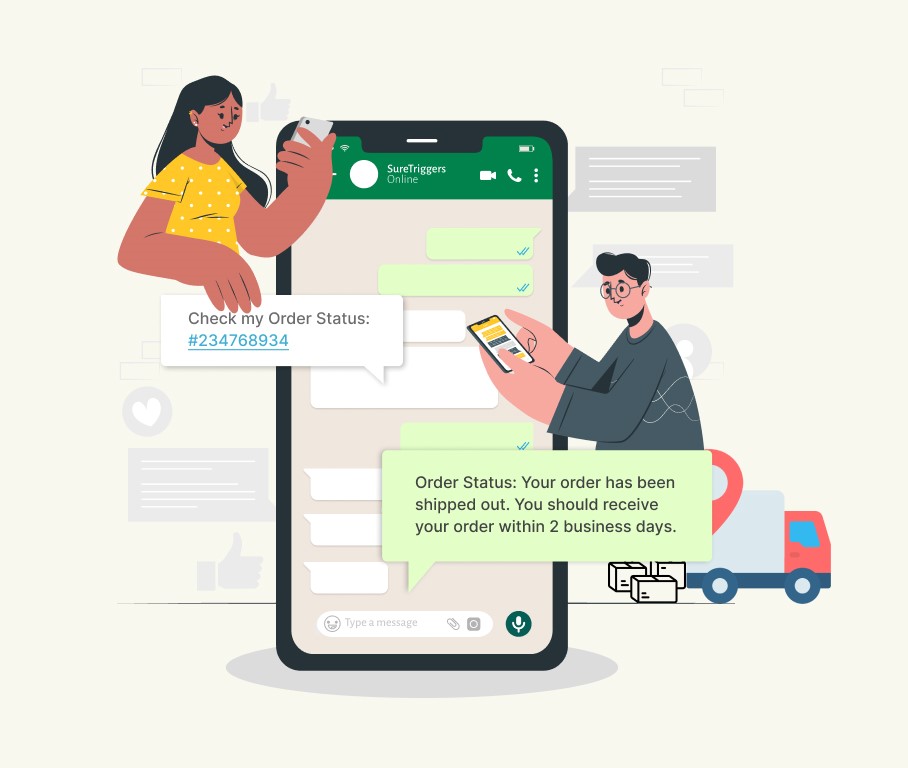
Imagine you’re running a small online store, and you want to keep customers informed about their orders.
With WhatsApp Cloud API, you can automatically send order confirmations, shipping updates, and even respond to customer queries—all through WhatsApp.
In the upcoming sections, we’ll guide you through the process of setting up WhatsApp Cloud API and show you how it can seamlessly integrate with SureTriggers to supercharge your digital experiences.
So, let’s keep the momentum going and explore this fascinating world of integration!
What Is the WhatsApp Cloud API Used For?
Now that we’ve grasped the concept of WhatsApp Cloud API and the role of APIs, let’s shift our focus to the practical side: What WhatsApp Cloud API can be used for.
WhatsApp Cloud API isn’t just a cool tech term; it’s a powerful tool that can make a significant difference in how businesses and developers operate in today’s digital landscape.
It’s like having a Swiss Army knife of messaging capabilities right at your fingertips.
Here are some real-world scenarios where WhatsApp Cloud API shines:
- Customer engagement: WhatsApp Cloud API allows you to automate personalized messages, send order updates, provide customer support, and even handle queries—all within WhatsApp. Imagine sending a friendly reminder for an upcoming appointment or instantly responding to customer inquiries with helpful information.
- Notifications: Whether it’s urgent alerts, service updates, or transaction confirmations, WhatsApp Cloud API can be your go-to notification tool. It ensures that important information reaches users directly through WhatsApp chat, where they’re likely to see it promptly.
- Marketing and promotions: Promoting products or services becomes more effective when done through WhatsApp. You can create and send engaging marketing messages, special offers, or promotions directly to customers’ WhatsApp chats, boosting your marketing efforts.
- Automation: WhatsApp Cloud API is a game-changer when it comes to automating routine tasks. You can use it to automate responses to frequently asked questions, manage appointment bookings, or even trigger actions in response to specific user interactions.
- Integration with other apps: WhatsApp Cloud API can seamlessly integrate with other tools, such as SureTriggers. This means you can create powerful workflows that connect WhatsApp with various apps and services, making your operations more efficient.
In the next section, we’ll delve into the process of setting up WhatsApp Cloud API.
How To Set Up WhatsApp Cloud API
Now that we’ve explored what WhatsApp Cloud API is and what it can do, let’s get practical.
In this section, we’ll guide you through the step-by-step process of setting up WhatsApp Cloud API.
You’ll discover how to connect this powerful messaging tool to your applications, opening the door to a wide range of communication possibilities.
It’s a three-step process to get access to WhatsApp Cloud API:
- Create a personal Facebook account.
- Create a Meta Developers account.
- Create a WhatsApp application in your Meta developer account.
Once you complete these three steps, you will get your WhatsApp Business ID, and Phone Number ID that you would need to use WhatsApp cloud API.
Create or Use Your Own Facebook Account
Before diving into the setup process of WhatsApp Cloud API, it’s essential to address the initial step: creating or using your existing Facebook account.
WhatsApp, as part of the Meta family, requires you to have a Facebook account to access its API services. If you already have one, great—this step becomes a breeze.
But if not, we’ll guide you through the process of creating an account.
Here’s how to set up your Facebook account:
- Visit Facebook: Go to the Facebook website.
- To create a Facebook account, fill in the details on the Facebook sign-up form: first name, last name, mobile number or email address, password, date of birth, and gender.
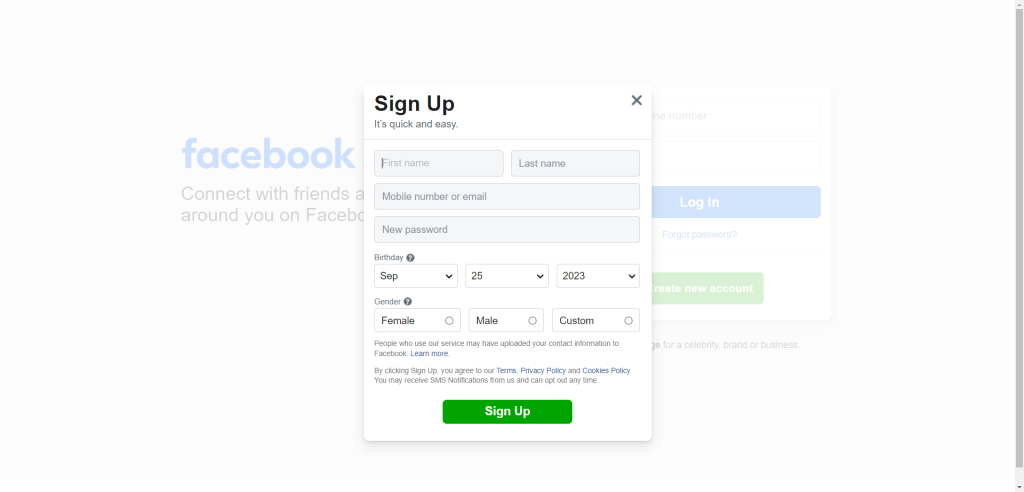
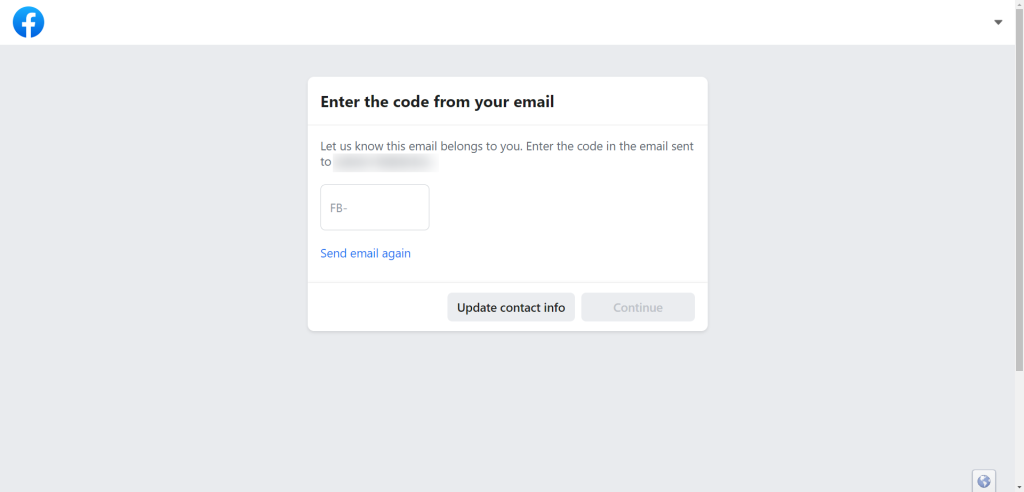
- Verification: Facebook will send a verification code to your mobile number or email address. Enter this code in the space provided to verify your account.
- Profile Setup: Facebook will guide you through setting up your profile, which may include adding a profile picture and cover photo. You can skip this step if you prefer to do it later.
- Welcome to Facebook: Once you’ve completed these steps, you’ll have a Facebook account. This account is crucial for accessing WhatsApp Cloud API services and integration.
Now you’re ready to proceed with creating a Meta Developer account.
Create or Use Your Meta Developer Account
Just as a Facebook account is a prerequisite, having a Meta developer account is essential for setting up WhatsApp Cloud API.
Here’s how you can create one or use an existing Meta developer account.
- Start by logging into your Facebook account. Then, proceed to the registration process by visiting https://developers.facebook.com/async/registration.
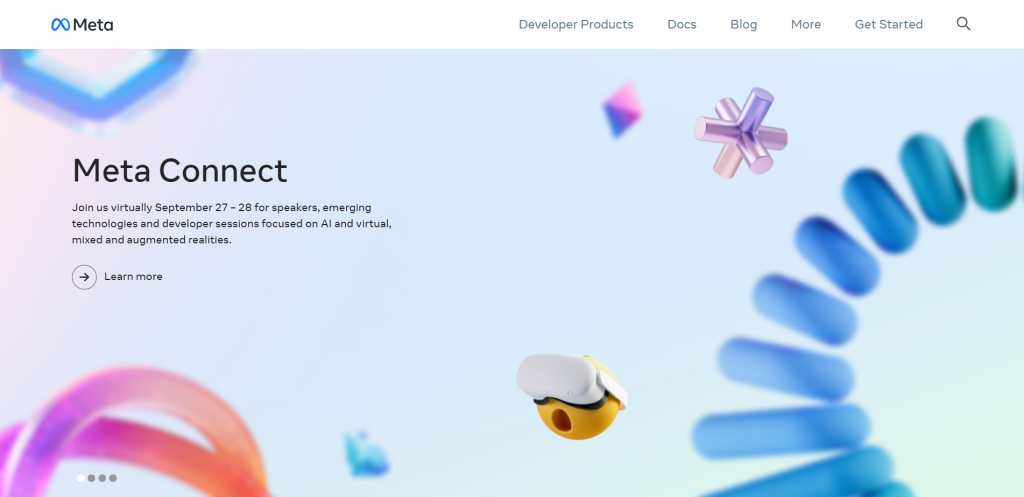
Alternatively, you can start by heading to the Meta for Developers website and selecting the Get Started option.
- Proceed to the next step by clicking Next to agree to the Platform Terms and Developer Policies.
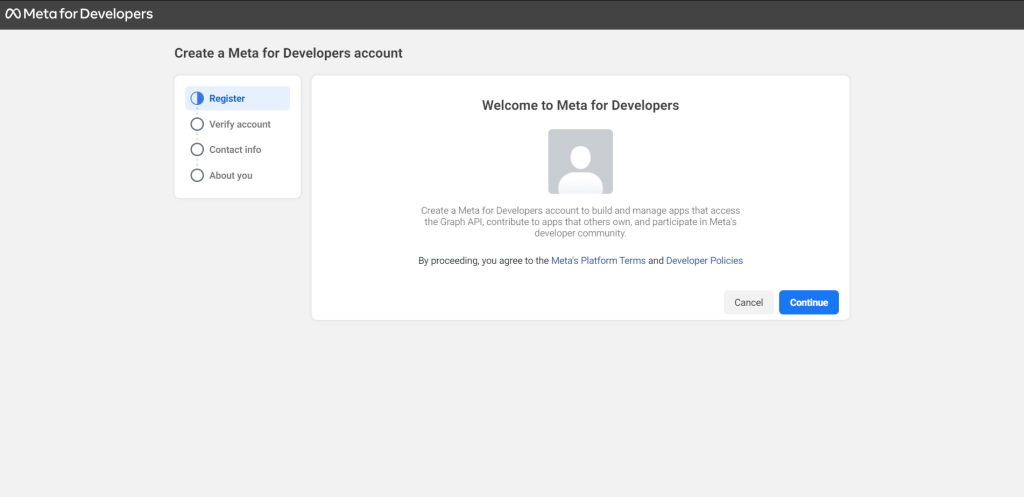
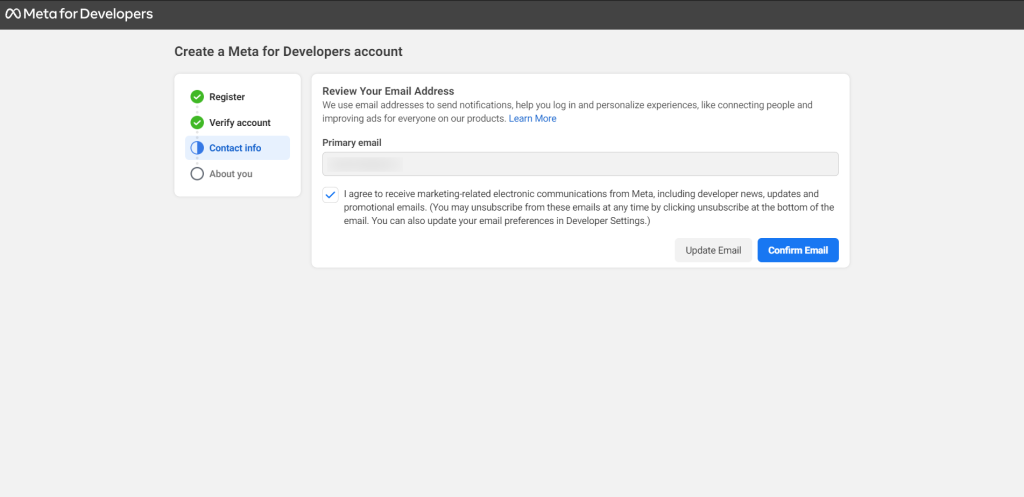
- For security purposes, you will be sent a verification code to the phone number and email address you provide. This step confirms your access to these contact points, which will be used for essential developer notifications regarding any changes that may impact your app.
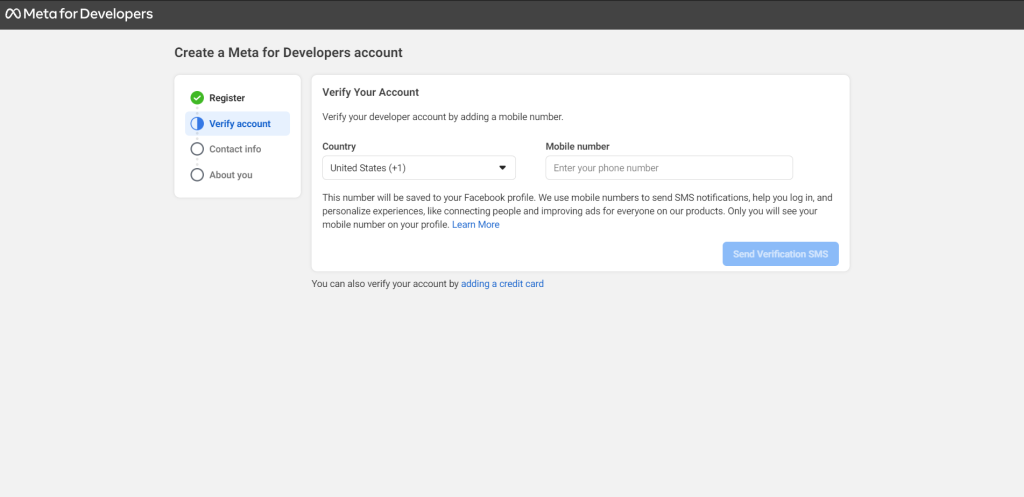
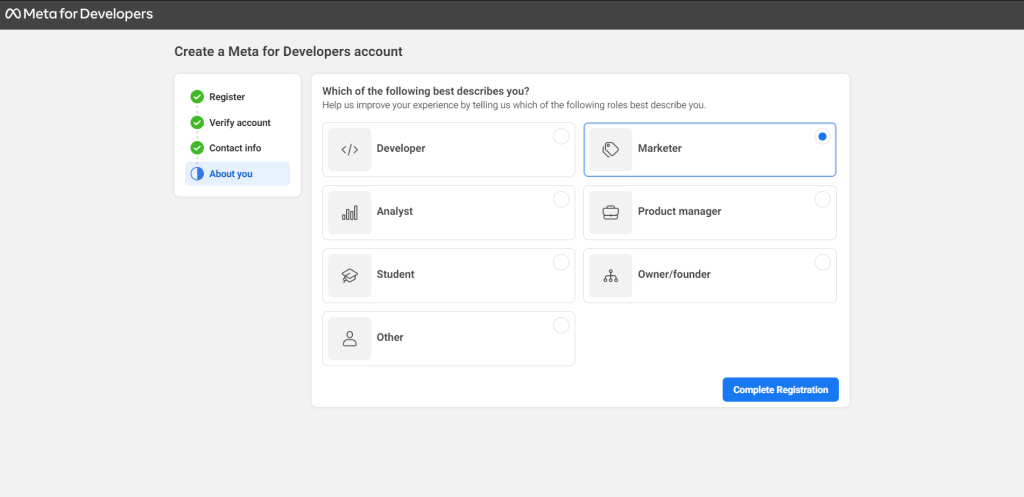
- Select the occupation that best describes your professional role.
With these steps completed, you’ll be well on your way to using the App Dashboard to create your very first Meta app.
Using an Existing Meta Developer Account
If you already have a Meta developer account, simply login to your account on the Meta for Developers website.
Having a Meta developer account allows you to access developer tools and resources, including WhatsApp Cloud API.
With both your Facebook and Meta developer accounts in place, you’re now ready to set up WhatsApp Cloud API and integrate it with your applications or services.
Creating a WhatsApp Application in Meta
Creating a WhatsApp application within your Meta developer account is the next step in setting up WhatsApp Cloud API.
Here’s how:
- Visit the Meta for Developers website and log in to your Meta developer account.
- Once logged in, locate the section or page related to the “My Apps” tab within your developer account dashboard.
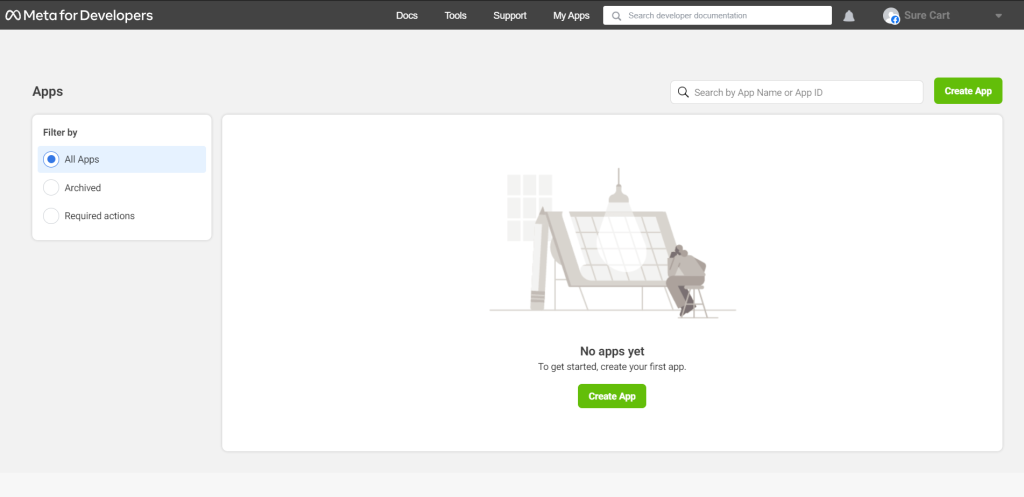
- Click on Create App to start the application creation process.
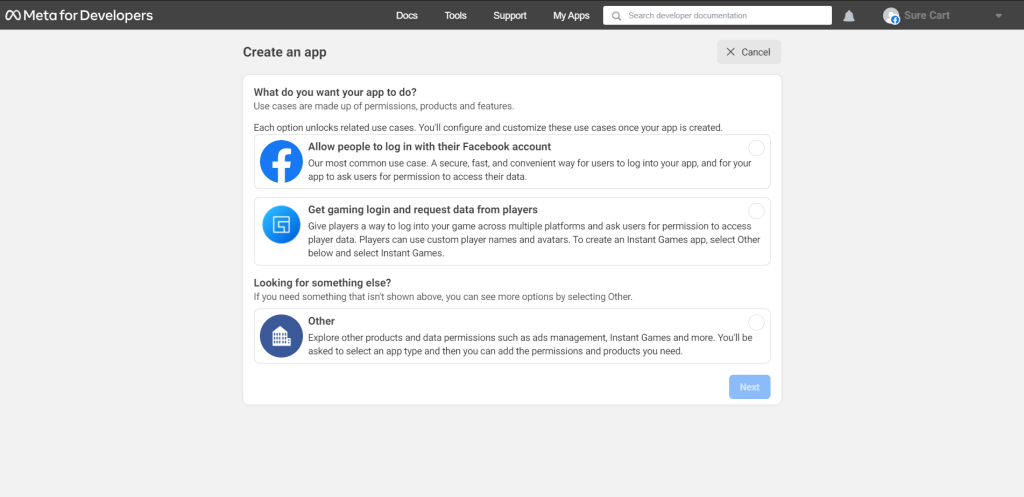
- Select Other as the app type since neither of the other options is applicable to our use case.
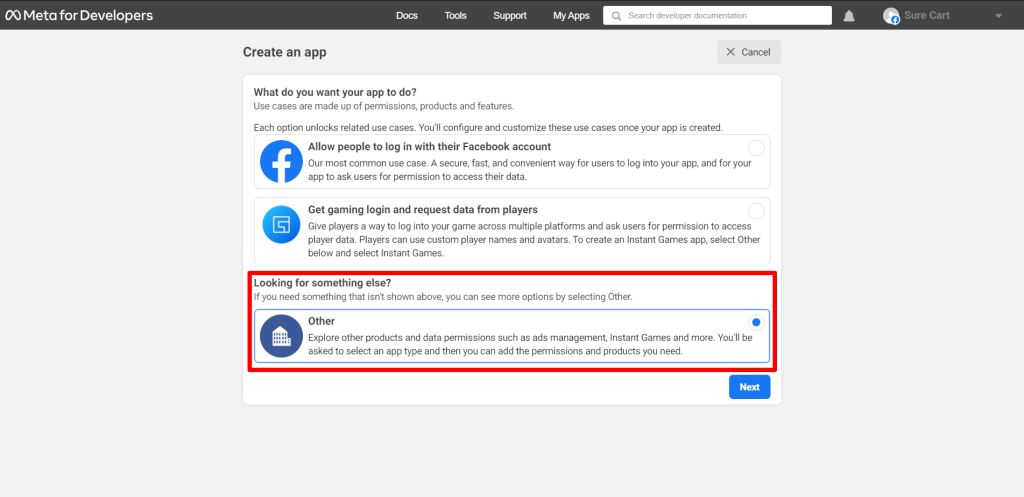
- Select Business as the app type since this will be used in WhatsApp.
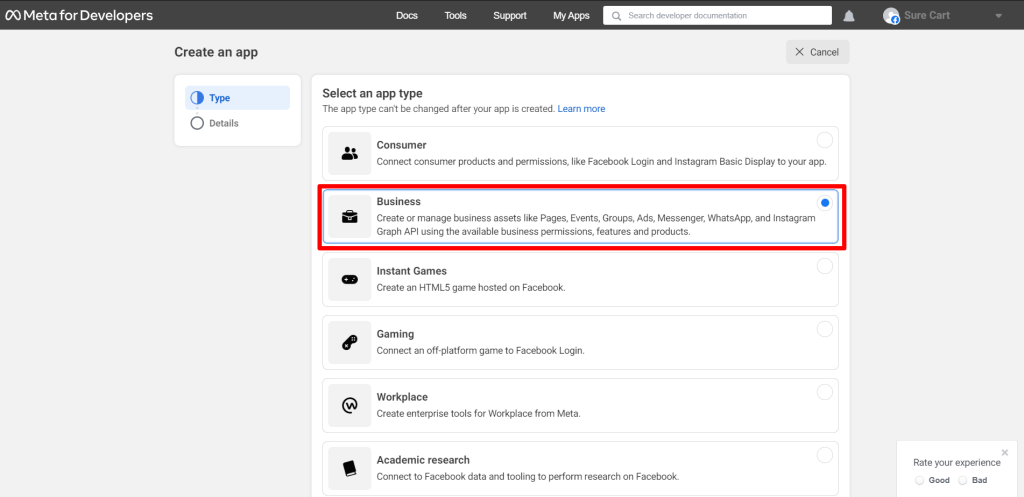
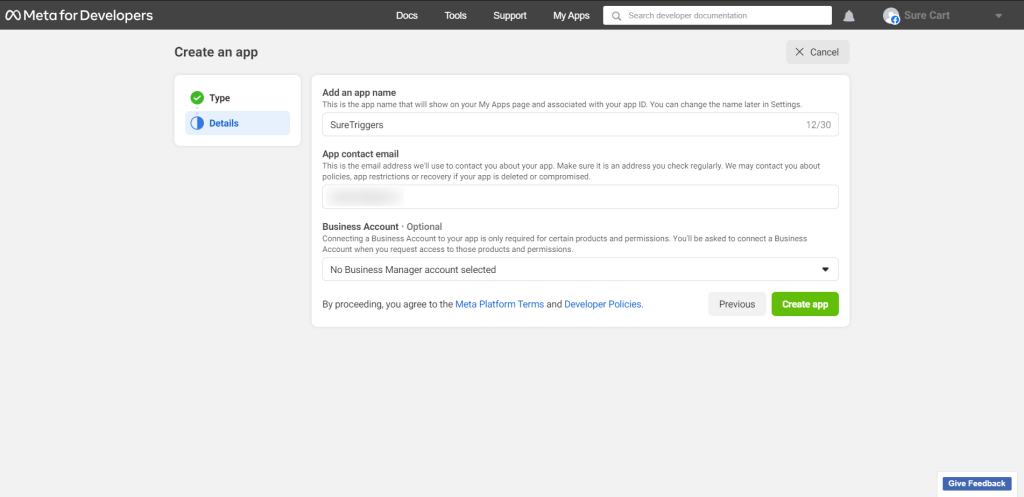
- Provide a display name for your application and, if applicable, link it to your business account. If you don’t have a business account, don’t worry; the Meta for Developers platform will allow you to create one later on.
- Click Create App when finished.
- Scroll down to the WhatsApp section and click Set up.
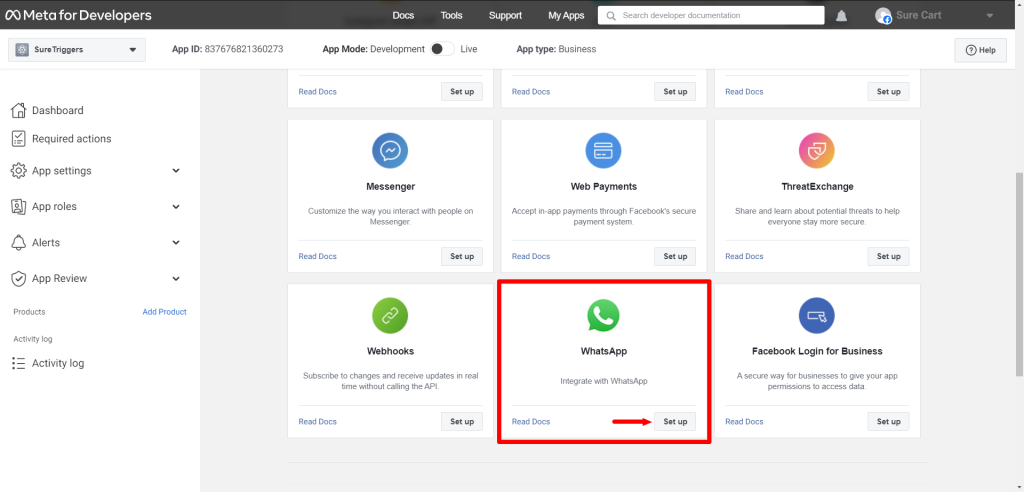
- Select an existing Meta Business Account or request the platform to create a new one. Click Continue.
Follow these instructions on how to create a Meta Business Account.
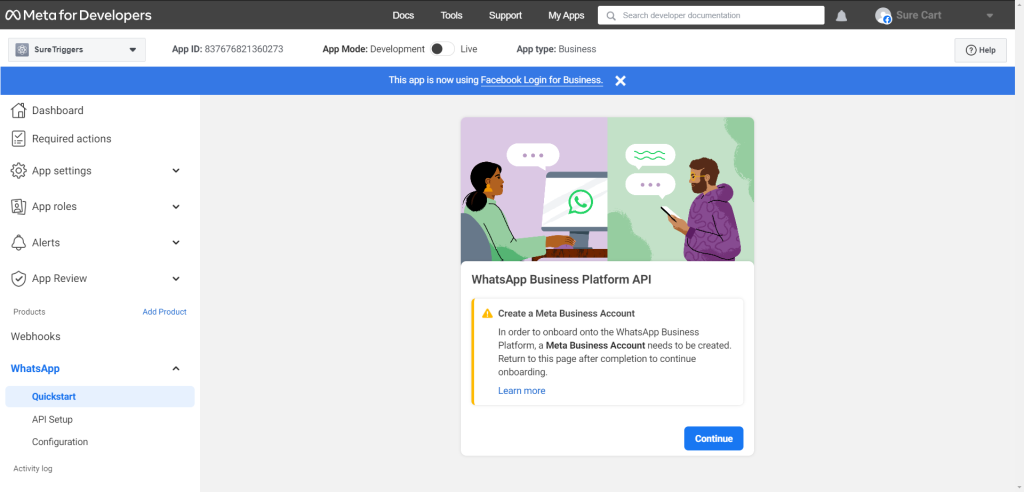
With these steps, your WhatsApp application is created and ready to use, complete with a temporary access token.
Note that this token has a limited lifespan, so we’ll show you how to generate a permanent access token for your applications and integrations below.
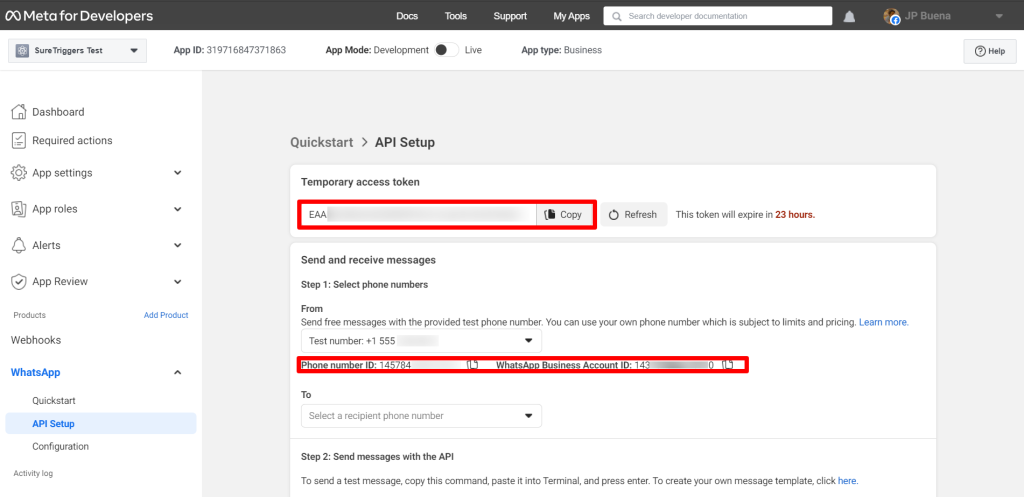
Take note that the Temporary Access Token, Phone Number ID, and WhatsApp Business Account ID are the important information that you need when using WhatsApp cloud API.
How To Get a Permanent Access Token for the WhatsApp Cloud API
After you’ve created a temporary access token and Phone Number ID, you can use it to do some testing with the WhatsApp cloud API like sending messages with API and doing other actions.
This temporary access token automatically resets after 24 hours, so you cannot use it for live operations.
Chances are that you want your app to access the API for more than 24 hours, so you need to generate a permanent access token.
Fortunately, the Meta for Developers platform makes this easy.
All you need to do is add a System User to your business account to obtain an access token you can use to continue accessing the API.
To create a system user and get the permanent access token, do the following:
- Go to Business Settings.
- Select the business account your app is associated with.
- Below Users, click System Users.
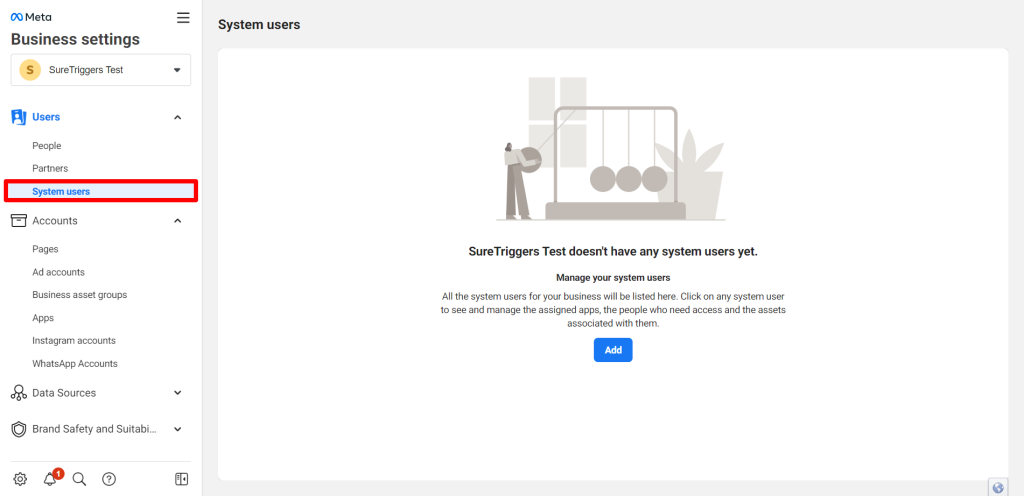
- Click Add. Make sure to read and accept the terms and policies.
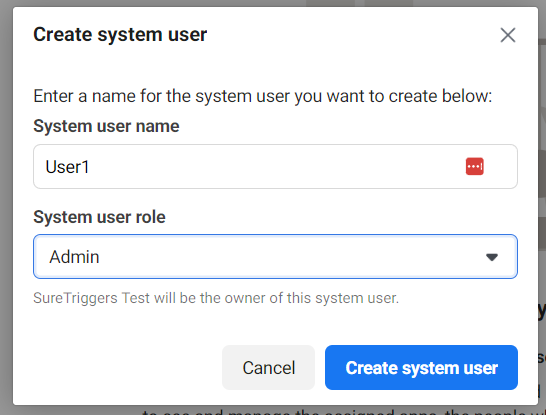
- Name the system user, choose Admin as the user role, and click Create System User.
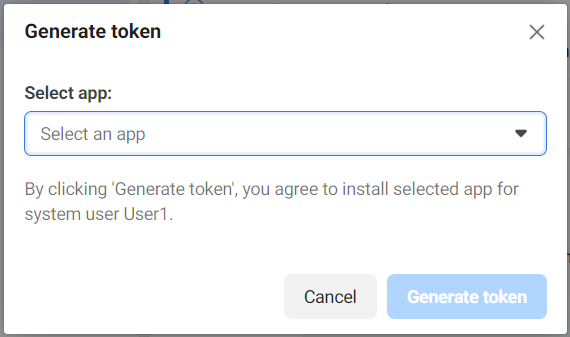
- Click Generate New Token.
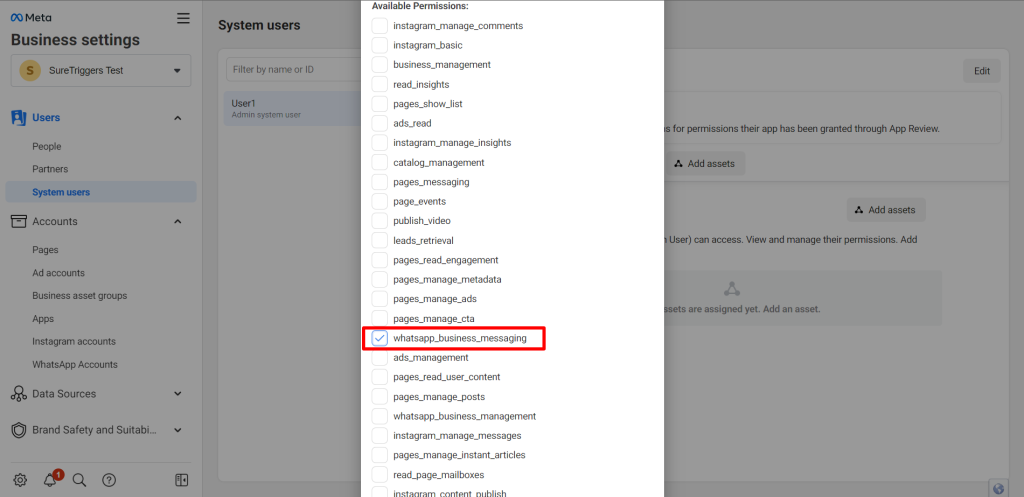
- Select the whatsapp_business_messaging permission.
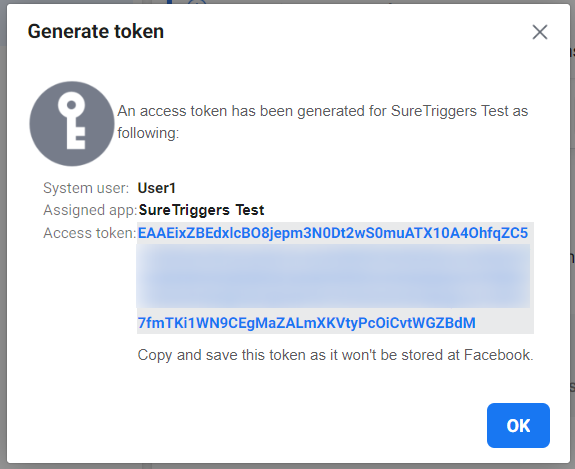
- Copy and save your token.
This permanent access token allows your application to access WhatsApp Cloud API for an extended period, making it ideal for long-term use.
With these steps, you’ve successfully obtained a permanent access token, ensuring continued access to WhatsApp Cloud API for your applications and automation.
What’s Next?
Once you’ve successfully set up your WhatsApp application and gained access to the WhatsApp Cloud API, you’re ready to explore the exciting world of messaging.
Here’s a step-by-step guide on how to send and receive messages through the API:
- Step 1: Select phone numbers
You have the flexibility to choose where your messages originate and to whom they are sent. Here are the options:
From: You can send free messages using the provided test phone number, or you can use your own phone number. Keep in mind that using your own phone number may be subject to certain limits and pricing. Learn more about this in the documentation.
To: Select a recipient’s phone number for your message.
- Step 2: Send messages with the API
To send a test message, simply copy the provided command, paste it into a terminal or preferred interface, and press enter. If you wish to create your message template, you can do so by clicking here.
- Step 3: Configure webhooks to receive messages
For seamless communication, it’s crucial to set up webhooks that allow your application to receive messages. You can either create a custom webhook URL or utilize services that simplify the process. For more details on configuring webhooks, refer to the documentation.
- Step 4: Learn about the API and build your app
To unleash the full potential of the WhatsApp Cloud API, delve into our comprehensive developer documentation. It provides in-depth insights on how to build your application and initiate message sending. Access the documentation here.
- Step 5: Add a phone number
If you intend to send messages to any WhatsApp number, you’ll need to add a phone number to your configuration. Manage your account information and phone numbers by visiting the Overview page.
- Step 6: Add a payment method
To ensure smooth communication, especially for business-initiated messages, it’s essential to add a payment method. After using up your monthly quota of 1000 free user-initiated conversations, having a payment method becomes mandatory.
By following these steps, you’ll be well-prepared to engage in effective messaging, whether it’s for customer support, notifications, marketing, or any other communication needs within your applications or services.
With these steps completed, you’ll have full access to the WhatsApp Cloud API, and your integrated application will be ready to leverage the power of WhatsApp’s messaging capabilities.
Leveraging WhatsApp Cloud API for Enhanced Communication
In this comprehensive guide, we’ve explored the WhatsApp Cloud API and unlocked its potential for businesses and developers.
We’ve explored every step, from creating your Meta developer account to obtaining permanent access tokens and integrating this powerful messaging tool into applications.
With your Meta developer account and WhatsApp application set up, you’ve gained access to a world of possibilities.
Real-time customer engagement, streamlined communication, and efficient automation are now at your fingertips. Plus, when seamlessly integrated with tools like SureTriggers, you can create dynamic workflows that enhance productivity and user experiences.
So, why wait? Dive into the world of WhatsApp Cloud API, powered by Meta, and explore the potential of real-time communication.
Embrace the future of messaging and automation, and watch your digital experiences and audience, customer or user engagement flourish. It’s time to take your communication game to the next level with WhatsApp Cloud API and shape the future of engagement, all with the help of SureTriggers – Start Free Trial Now!
Recommended Articles
How To Share Logins Across WordPress Websites
What Are Webhooks? A Simple Guide to Using Them Like a Pro